
Aquascape Photography: Camera Settings, Lighting & the Perfect Contest Shot
Start with a faithful view
A strong aquascape photograph makes the real arrangement easy to read: the main group, the spaces around it, the plant textures and the depth between them. Before buying another lens, solve the things a camera cannot fix—dirty glass, a reflected window, a hidden focal opening or fish that are uncomfortable during the session.
Set up a repeatable front view, make a test frame and inspect it at full size. Then change the specific cause of a problem. A tripod will not freeze a swimming fish, and sharper export settings will not restore an out-of-focus rear plant group.
Use this lesson for the camera work. Preparing the aquarium for the final photo is a separate workflow; Aquascaping Contests explains event selection and rules.
Choose a camera that gives you useful control
A recent smartphone can make a useful full-aquarium image. Start with its main camera rather than an ultrawide lens pressed close to the glass. Clean the lens, support the phone and lock focus and exposure when the app allows it. Digital zoom usually trades away pixels; a genuine second camera can behave differently. Check the actual file rather than the zoom label.
A mirrorless or DSLR camera adds a wider choice of lenses, apertures, focusing tools and file formats. A larger sensor can be useful in limited light, but sensor size alone does not guarantee more detail through aquarium glass. Lens quality, focus, movement and the final framing still matter. Compare angle of view using the camera’s sensor format; a stated 35 mm lens and a phone’s 35 mm-equivalent view are not the same physical focal length. [focal]
Shoot RAW plus JPEG if the camera offers it and storage permits. RAW preserves more processing choices; JPEG is a finished rendering and is often the required submission format. Keep the original camera files separately from your edited exports. A RAW file is not proof that every clipped highlight can be recovered. [raw]
Make the front glass your alignment check
For a full frontal view, start with the camera centered horizontally and the lens axis near the middle of the photographed underwater area. Keep the sensor plane parallel to the front glass and the camera level. Compare opposite edges: an unexpected trapezoid usually means the camera is tilted or off-axis, not that the aquarium needs reshaping.
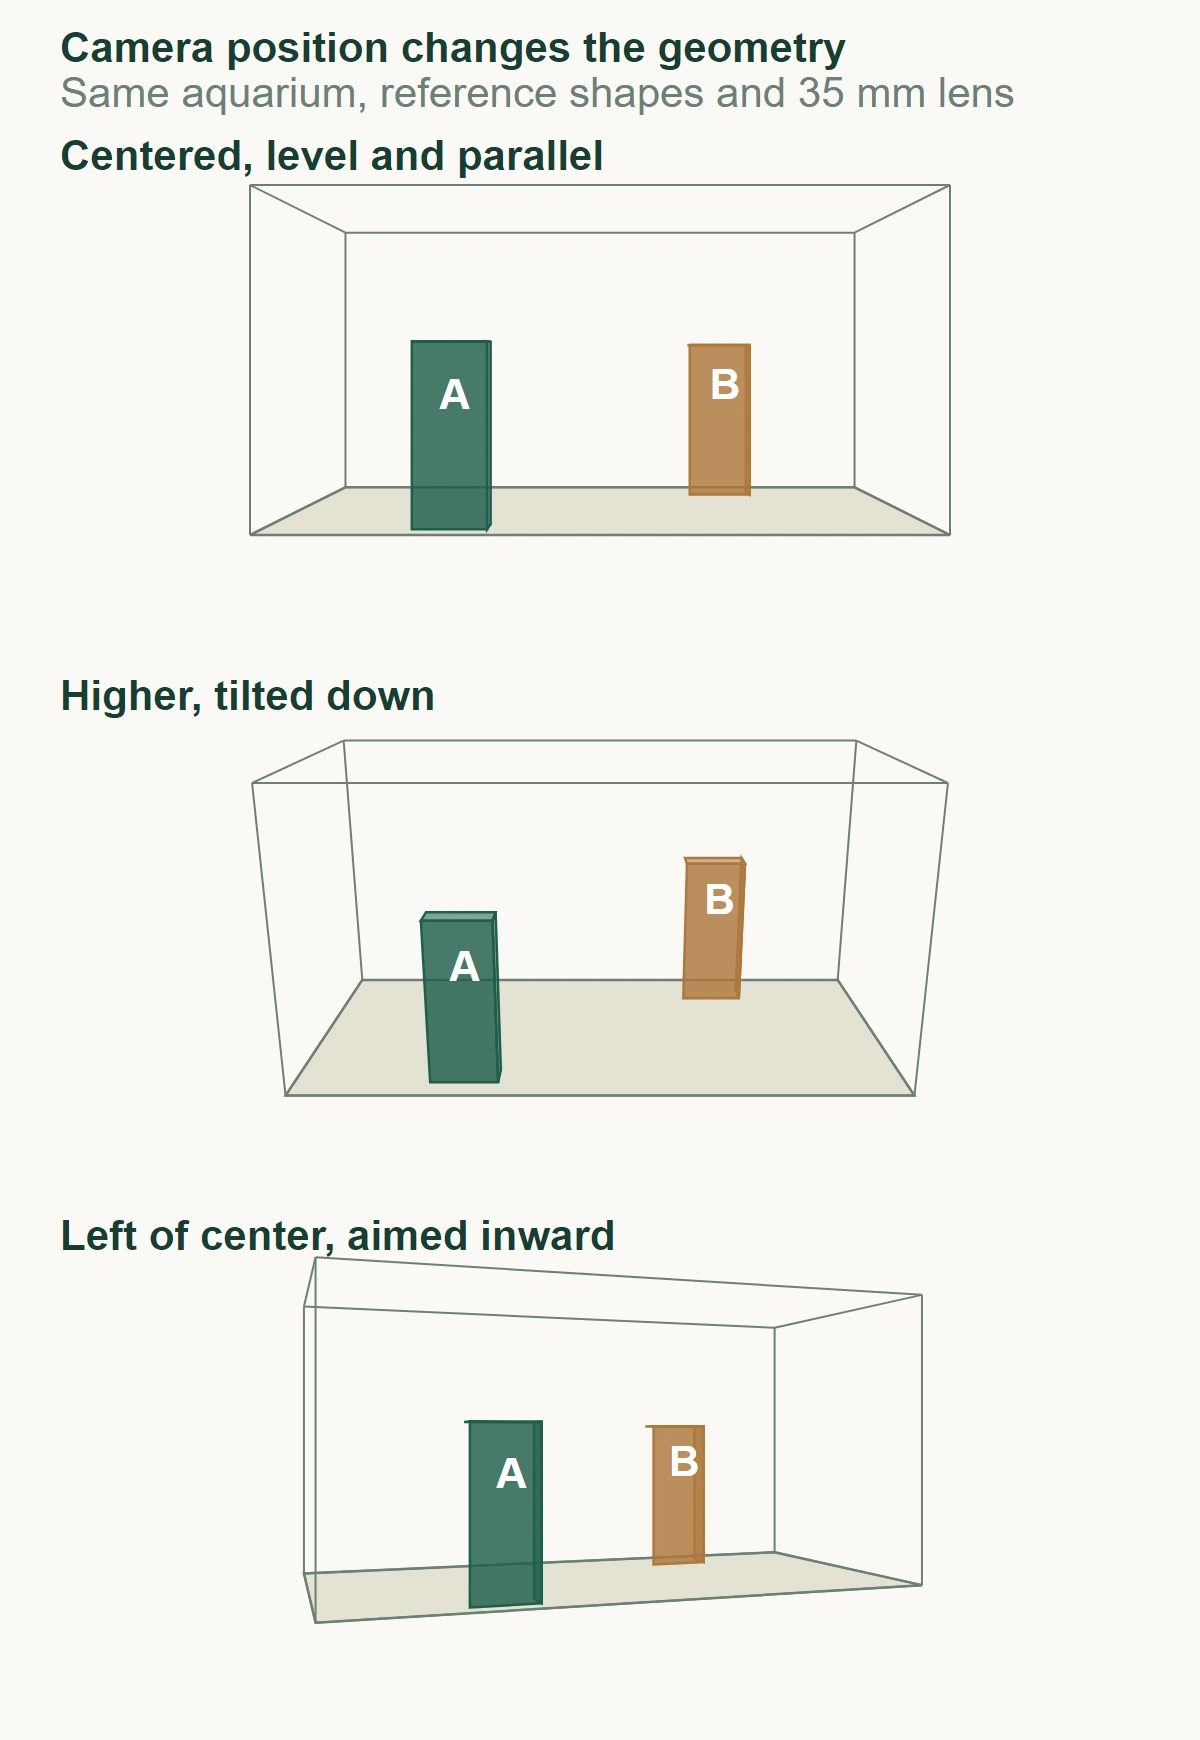
Moving the camera higher and tilting it down reveals more ground but changes the relationship between foreground and rear groups. Moving to one side reveals a different overlap. Those views can be useful for planning or details, while an event may require the whole aquarium from directly in front. Frame to the actual rule, including its treatment of the waterline; do not assume you can repair the composition by cropping later. [ada-camera]
Separate camera distance from focal length
Choose the viewpoint first, then a focal length that frames it. From a fixed camera position, changing focal length changes the angle of view and image size. It does not independently change the near-to-far perspective. The familiar “compression” comparison also moves the camera: a longer lens is used from farther away to keep the front of the aquarium the same size.
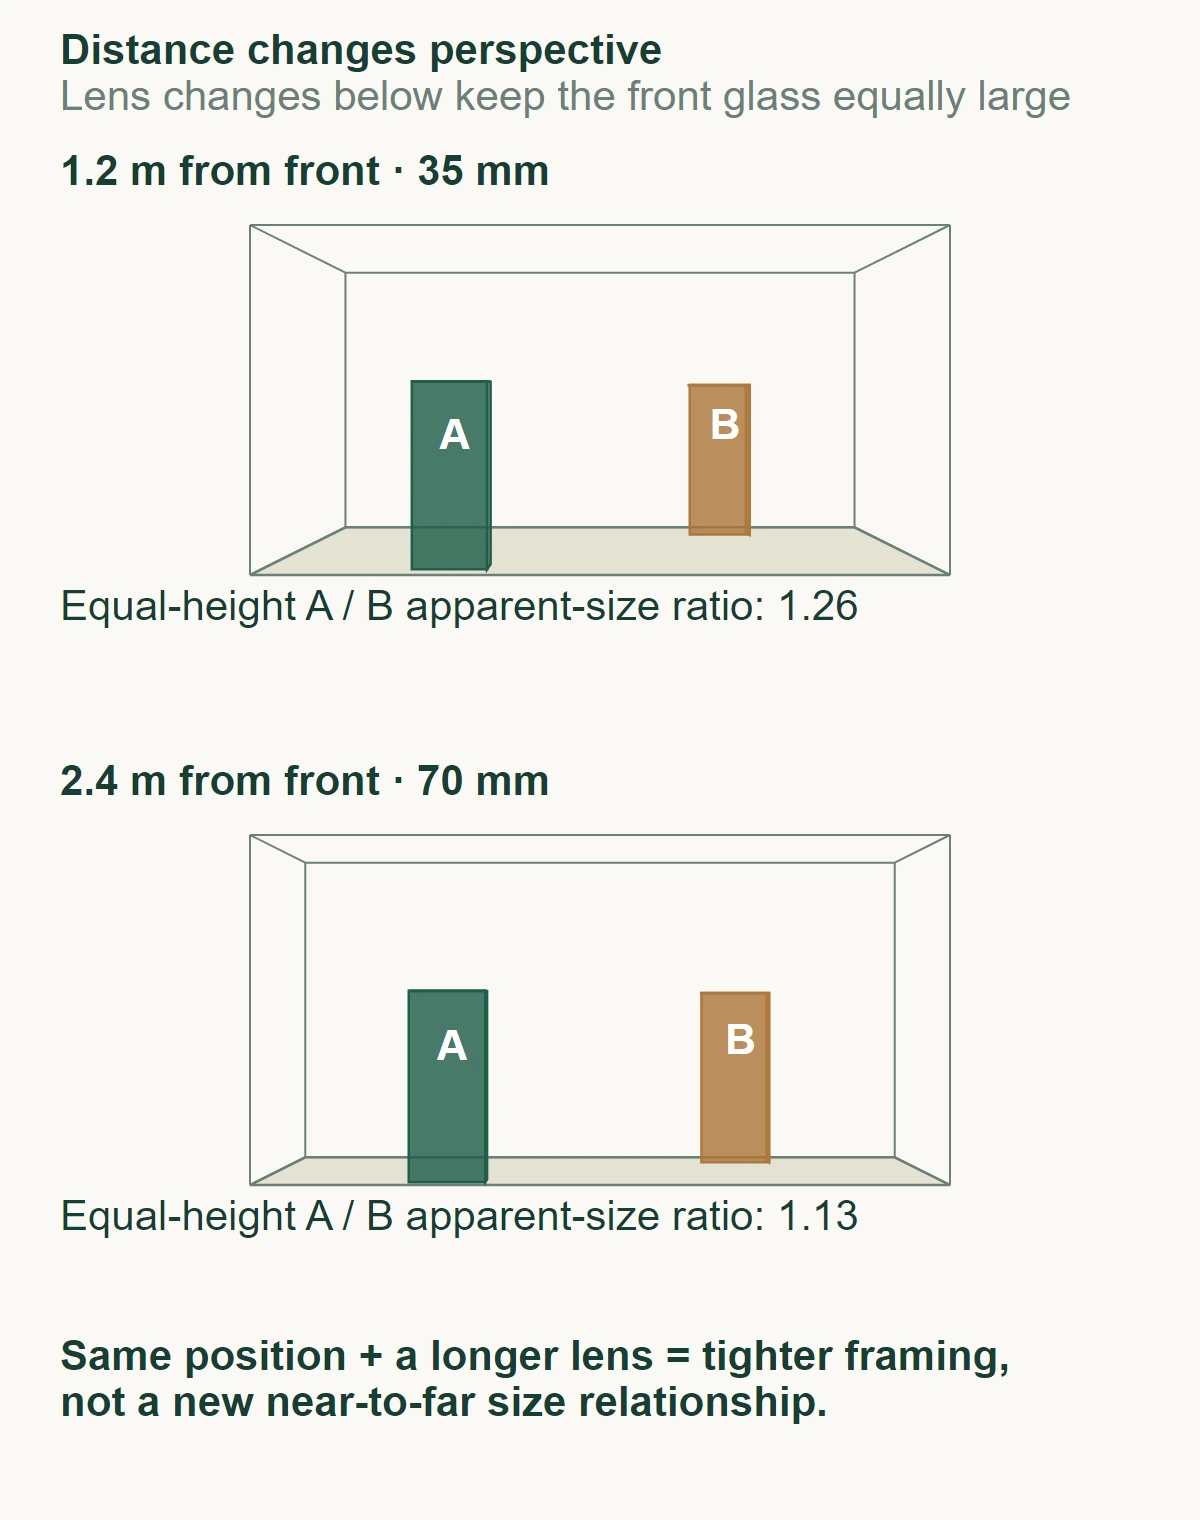
Use the model as a way to think, not an underwater measurement. If the nearer rock looks too dominant in your test frame, try a little more distance and a longer focal length while preserving the required framing. Check the result against the actual front view. Refraction through glass and water, lens distortion and limited room space also affect the photograph.
Use what you learn in My Aquariums
Follow a new aquarium through cycling or see how water readings and care change over time in an established setup.
Control room reflections before changing the aquarium
Look at a dark area of the front glass from the intended camera position. A reflected window or pale shirt is easier to notice there than over bright sand. Close the curtains or work when the window is dark, turn off unnecessary room lights, wear dark clothing and use a remote release or timer so you can step away. ADA demonstrates these practical approaches for phones as well as larger cameras. [ada-phone]
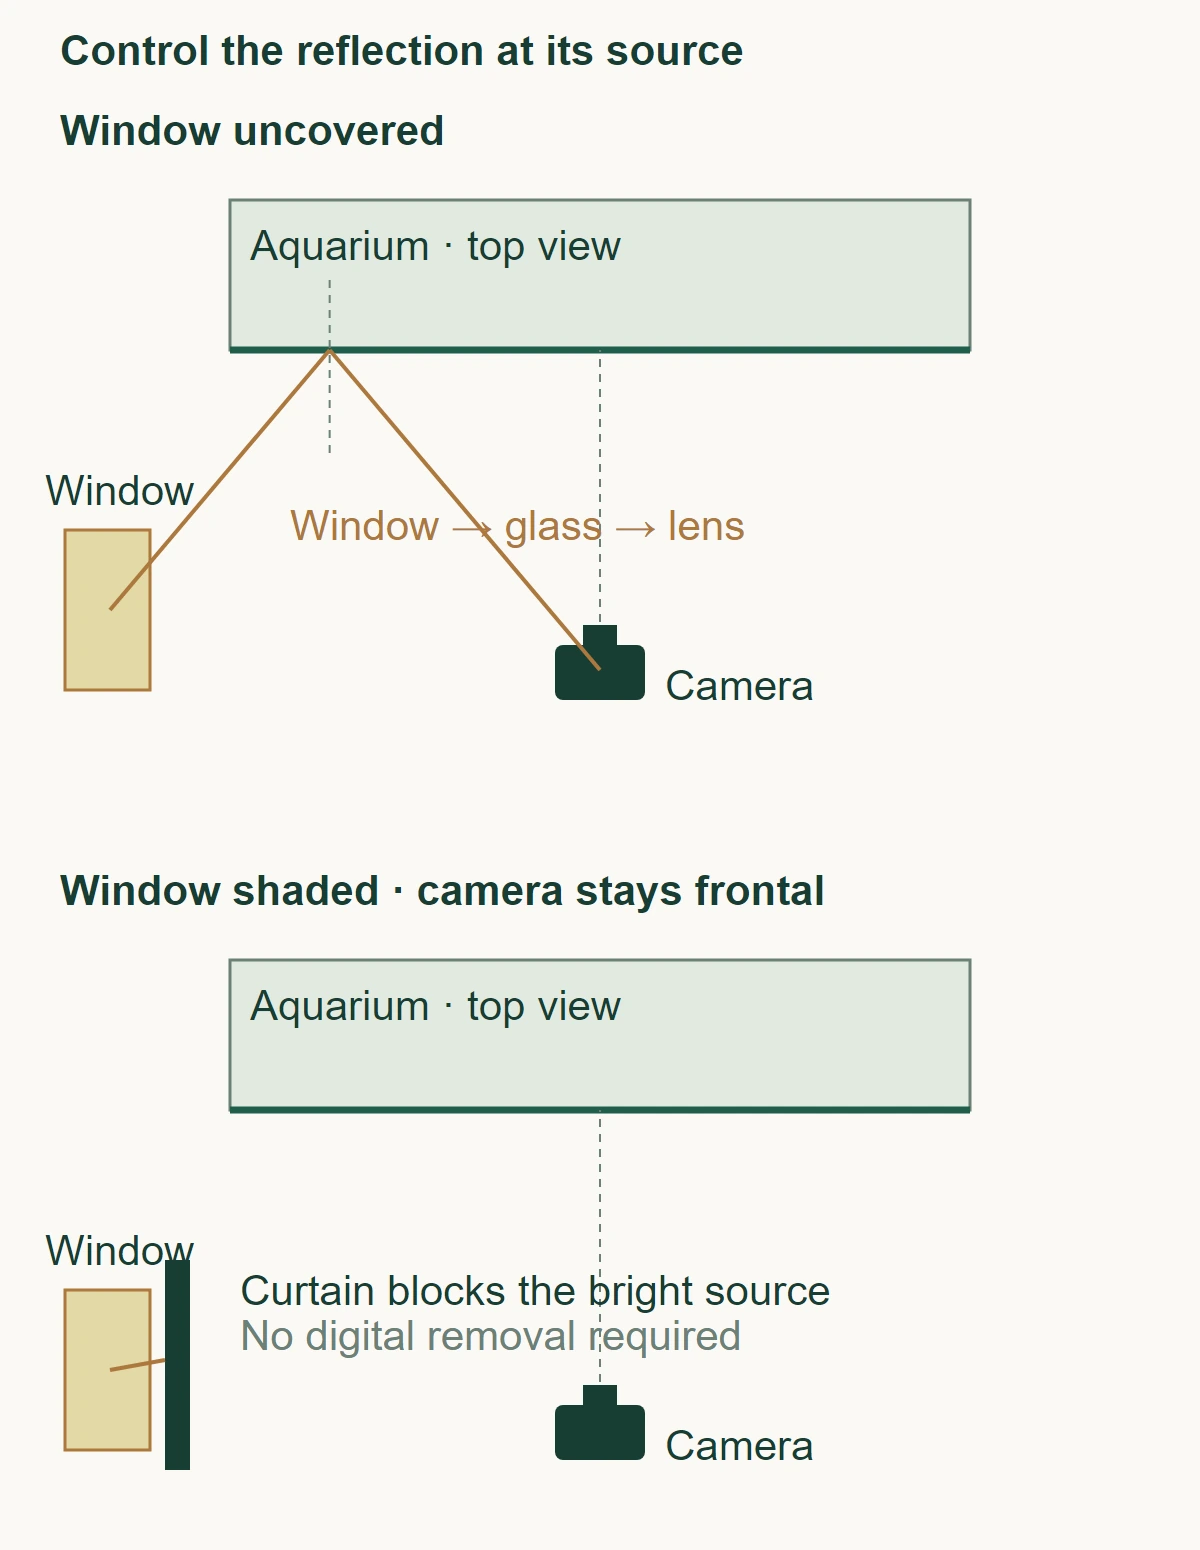
Keep the camera frontal when that is required. Moving to an oblique angle may remove one reflection while changing the composition and introducing others in the side glass. A matte screen with a small lens opening can help hide a bright camera or photographer; keep screens safely outside the aquarium and clear of the lens view.
A circular polarizer can reduce some nonmetallic reflections, but its effect depends on the angle and the particular reflected light. It also costs light and can change color relationships. Test it from the final position and compare the entire frame; it is not a substitute for shading the window. [polarizer]
Use light deliberately, without changing the care routine
Begin with the normal aquarium light and a consistent stage of its usual daily schedule. Move or shade a room reflection before changing plant lighting. Extra photo lights and illuminated backgrounds can change the look considerably; they need stable placement, control of glare and safe separation from water. Do not extend the photoperiod or improvise electrical equipment to rescue a picture.
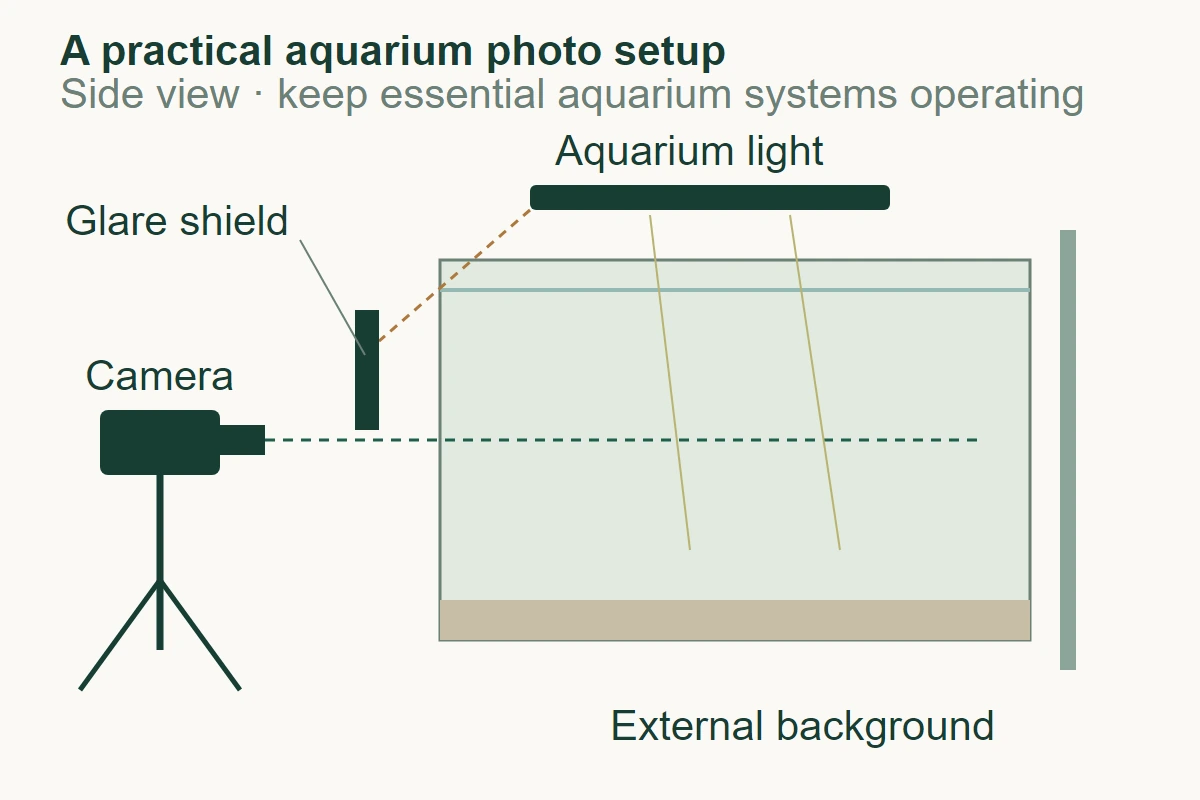
Light entering the lens directly can reduce contrast. An appropriate hood or external shield can block that path while leaving the aquarium light unobstructed. Keep anything near a fixture clear of heat, ventilation and splash. A dark recess can support depth; avoid lighting every shadow flat merely to make the whole aquarium equally bright.
Mixed room and aquarium light can give different areas different color casts. LED spectra also vary; white balance cannot recreate wavelengths a light does not provide. Compare leaf and rock colors with the aquarium under the same light rather than maximizing saturation.
Set exposure around the subject that moves
Shutter time determines how long movement is recorded. Aperture changes the light entering through the lens and the available depth of field. ISO changes the camera’s response to the captured signal; raising it does not add light to the scene. Aim for the shortest exposure you need, enough depth of field for the important layers, and an ISO that keeps the file usable.
| Situation | Useful first decision | What to inspect |
|---|---|---|
| Layout with nearly still plants | Support the camera and test a moderate aperture | Near and rear leaf detail, bright sand and reflections |
| Fish crossing the frame | Shorten exposure before insisting on the lowest ISO | Eyes and fins, not only the motionless rocks |
| Deep aquascape with soft rear plants | Check focus position and aperture together | Whether more depth of field actually improves the final file |
| Very limited light | Accept a suitable ISO or plan another normal-light session | Noise and movement; do not force a longer care photoperiod |
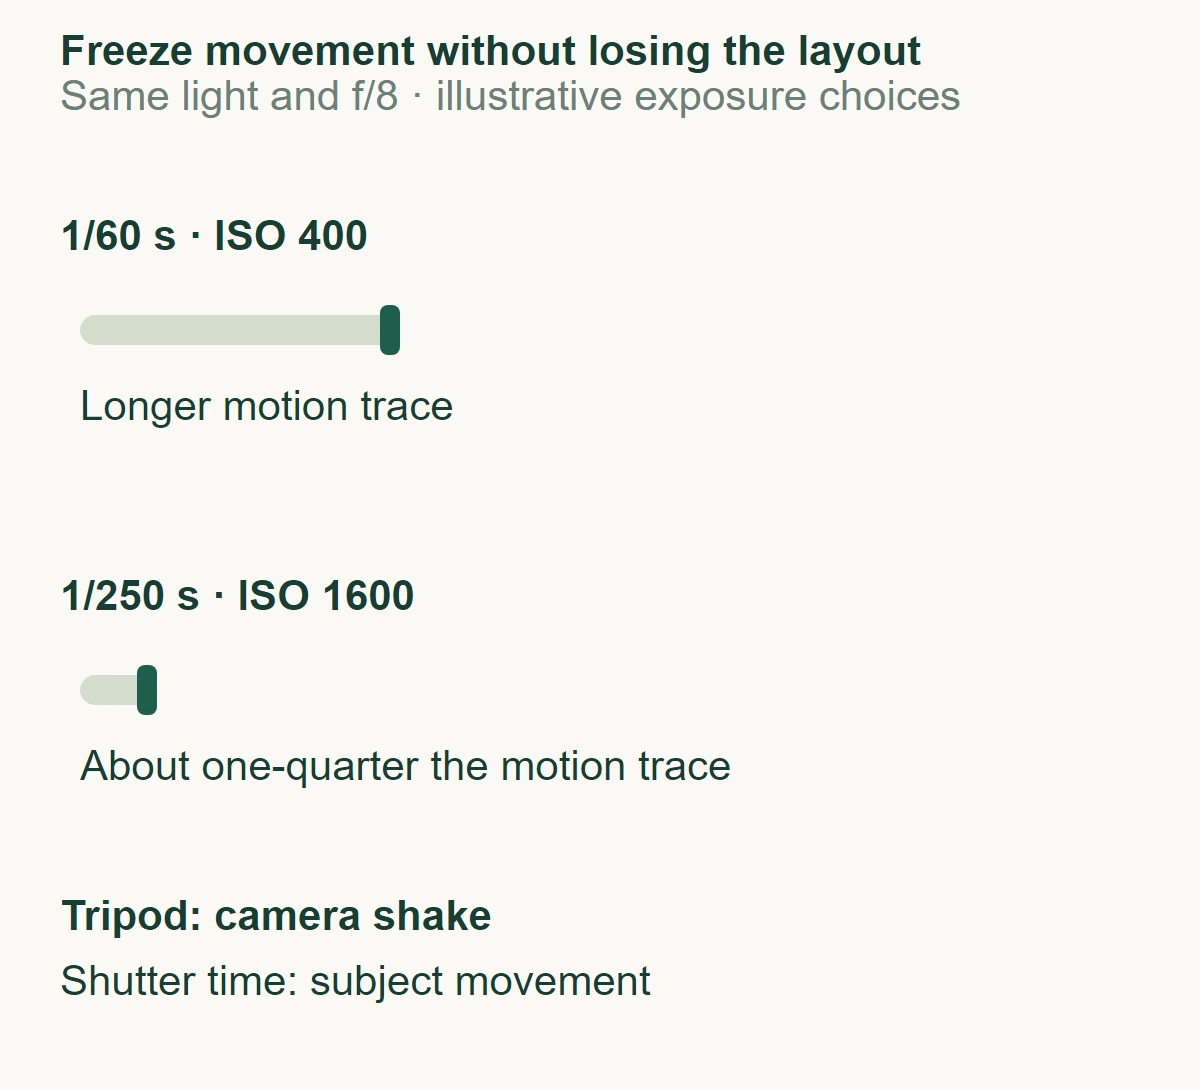
For example, changing from 1/60 second at ISO 400 to about 1/250 second at ISO 1600, with aperture and light unchanged, gives roughly similar rendered brightness and much less time for movement. These are illustrative settings, not settings recovered from our images. The faster frame still may not freeze a quick fish. Test, magnify and adjust.
Focus through the aquarium, not on the glass
Check a textured detail within the intended scene rather than a reflection or dirt on the front pane. Magnify the preview and compare the nearest important object, the middle group and the rear planting. Do not assume that focusing on the front glass or blindly using the “one-third point” gives the best result through water.
On an interchangeable-lens camera, test a moderate aperture, then stop down only if the additional depth is useful. Smaller apertures require more exposure and eventually trade fine detail for diffraction. Depth of field also depends on subject distance, focal length and the chosen focus position; one aperture is not a universal aquarium setting. [dof] [aperture]
A rigid tripod and remote release reduce camera movement. Check the camera manual for its stabilization advice on a tripod. Optical or body stabilization cannot stop a fish, a swaying leaf or particles moving through the water. [shake]
Clean suitable glass surfaces with appropriate aquarium tools. Algae film, external smears, scratches, condensation and suspended particles are different problems. Focus and sharpening cannot make each disappear. Diagnose the cause of cloudy water through the water-clarity guide rather than adding a last-minute clarifying treatment for a photo.
Photograph fish without arranging them by force
Let livestock settle into its normal behavior. Use a short burst when a natural grouping crosses a useful area, then select a single frame. Tracking autofocus can help a moving subject, while a small single focus area may be more reliable for a static layout. Try the appropriate mode before the final session.
Inspect the fish as well as the plants: a sharp rock does not mean the fish’s eye is sharp. Do not chase, tap the glass, crowd fish, introduce unsuitable animals or use drugs to obtain a pose. Stop if behavior suggests distress. A composition should work with the inhabitants’ needs, not require a temporary school assembled for the camera.
Recognize LED banding
Horizontal bands or inconsistent brightness between frames can come from the interaction between a camera’s shutter readout and flickering light. Test the camera’s available anti-flicker controls, a mechanical shutter where appropriate, or a different shutter time. Check the actual light and camera together; there is no one shutter speed that eliminates every LED driver’s flicker. [flicker]
A slower exposure may reduce bands but blur fish. Decide whether a different normal-light moment or a more suitable supported lighting setup is needed. Do not assume that the local mains frequency is the frequency of every dimmed LED.
Set color and brightness separately
Lock a repeatable white balance before comparing a sequence. A neutral reference photographed under the same lighting can help, provided using it is safe and does not contaminate the aquarium. Avoid assigning a precise Kelvin value from the fixture’s marketing label alone. A green or magenta tint is a separate issue from a simple warm/cool shift.
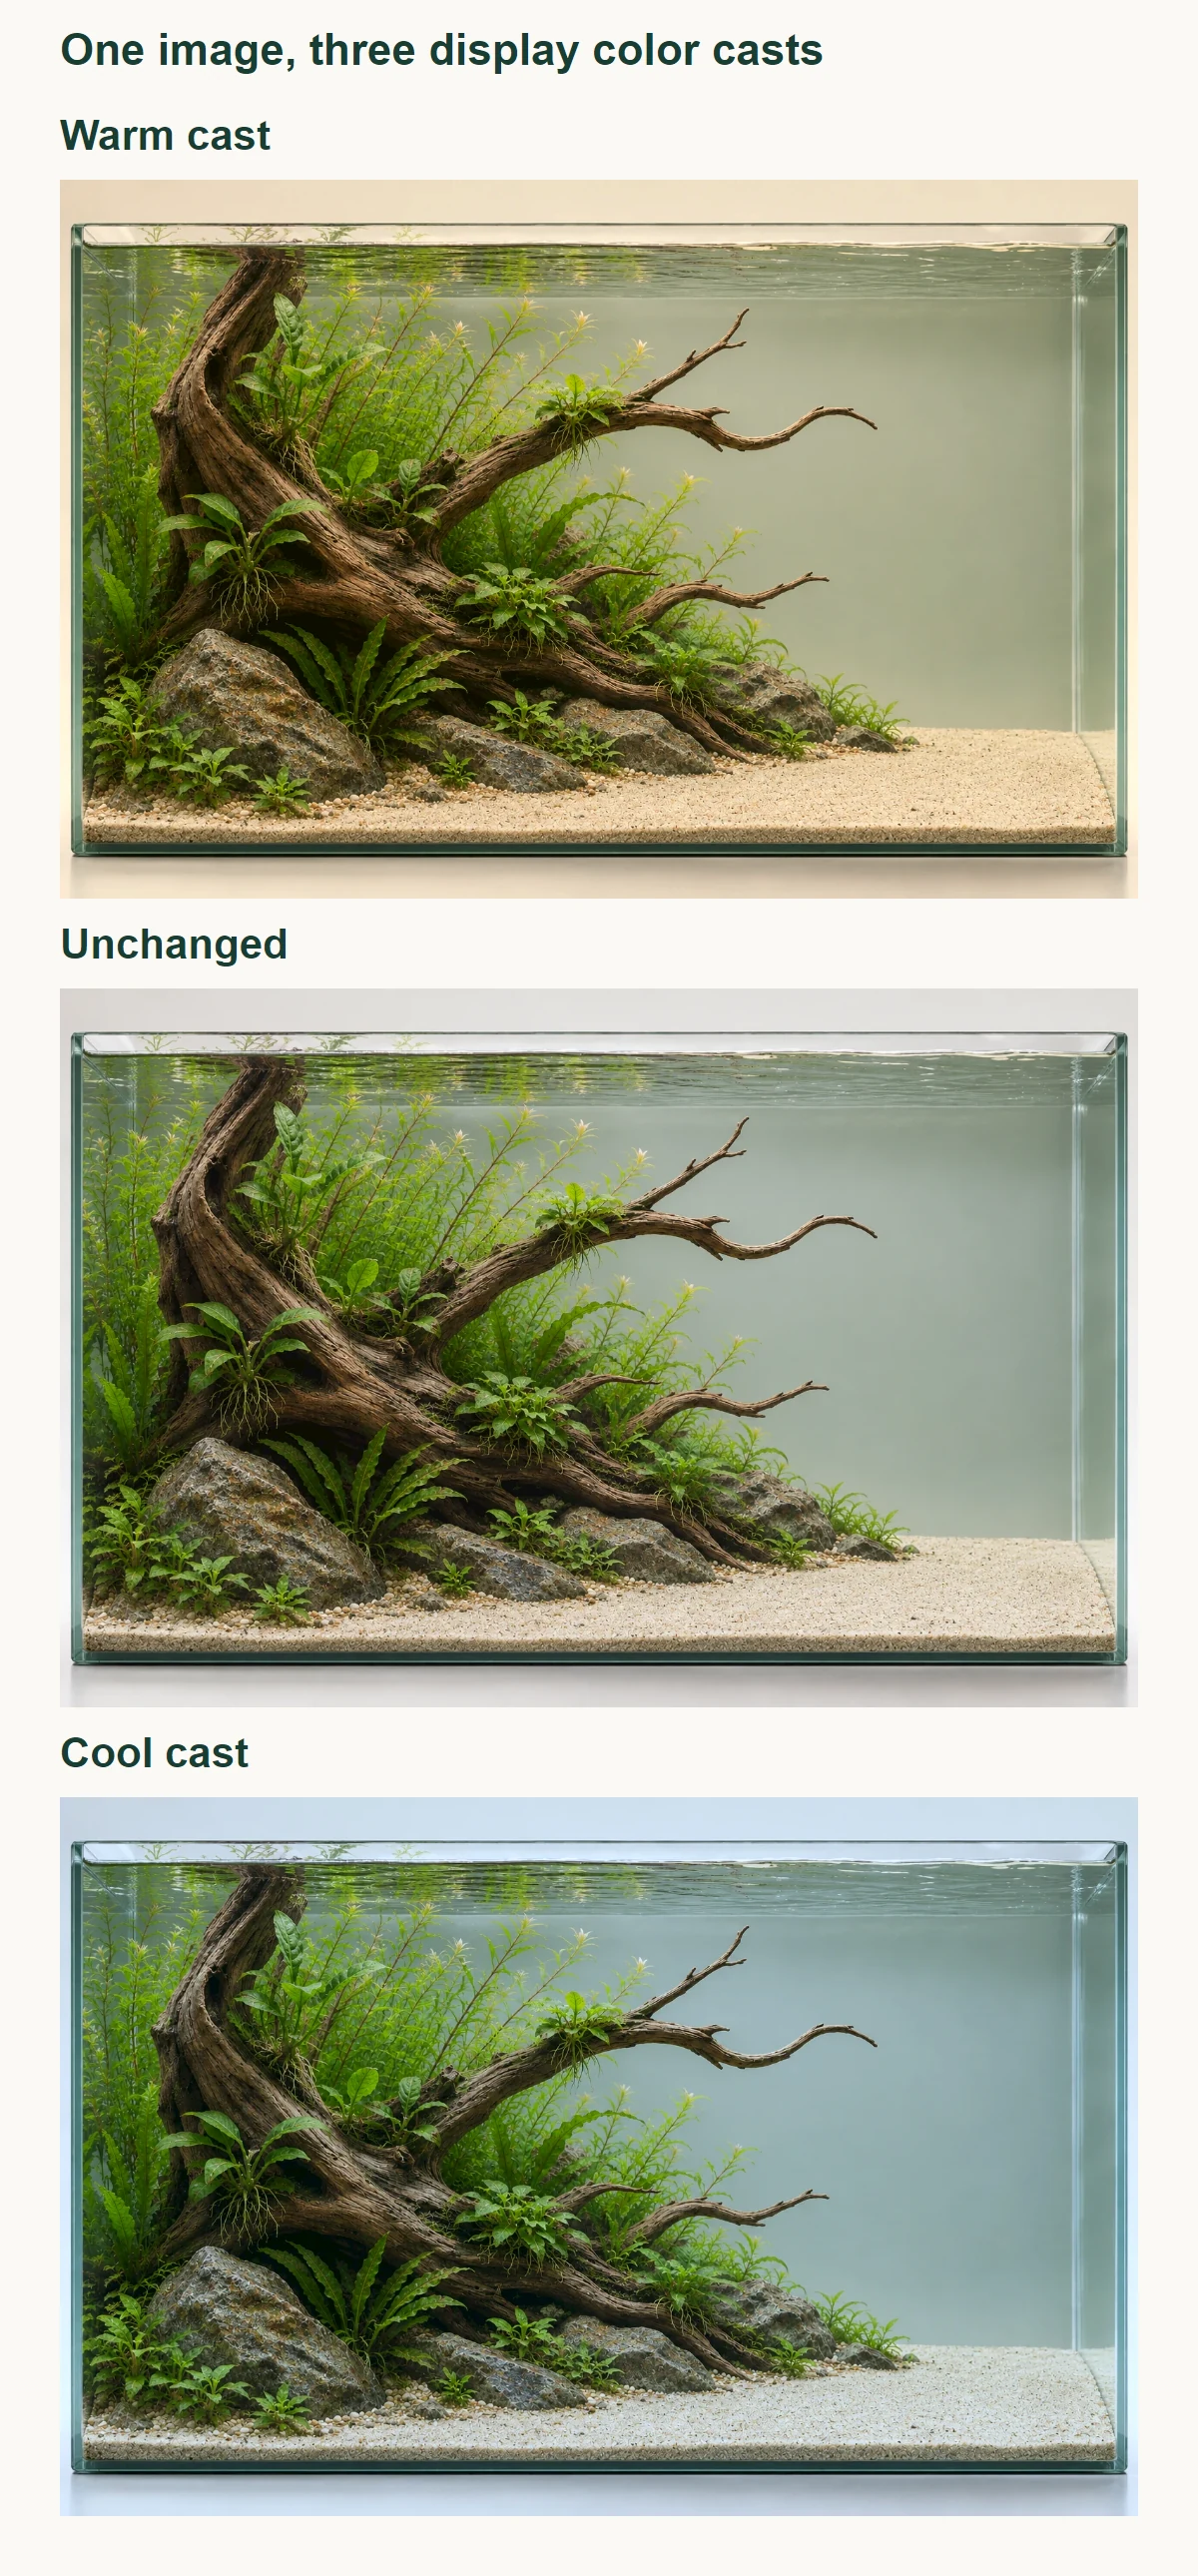
Use RAW controls for measured, restrained corrections. Check whether pale leaves or copper stems have lost texture in an individual color channel. A pleasing overall brightness can conceal clipped color. Camera histograms usually describe a rendered preview, so use them as warnings and verify the original in your editor; do not promise recovery from the preview alone.
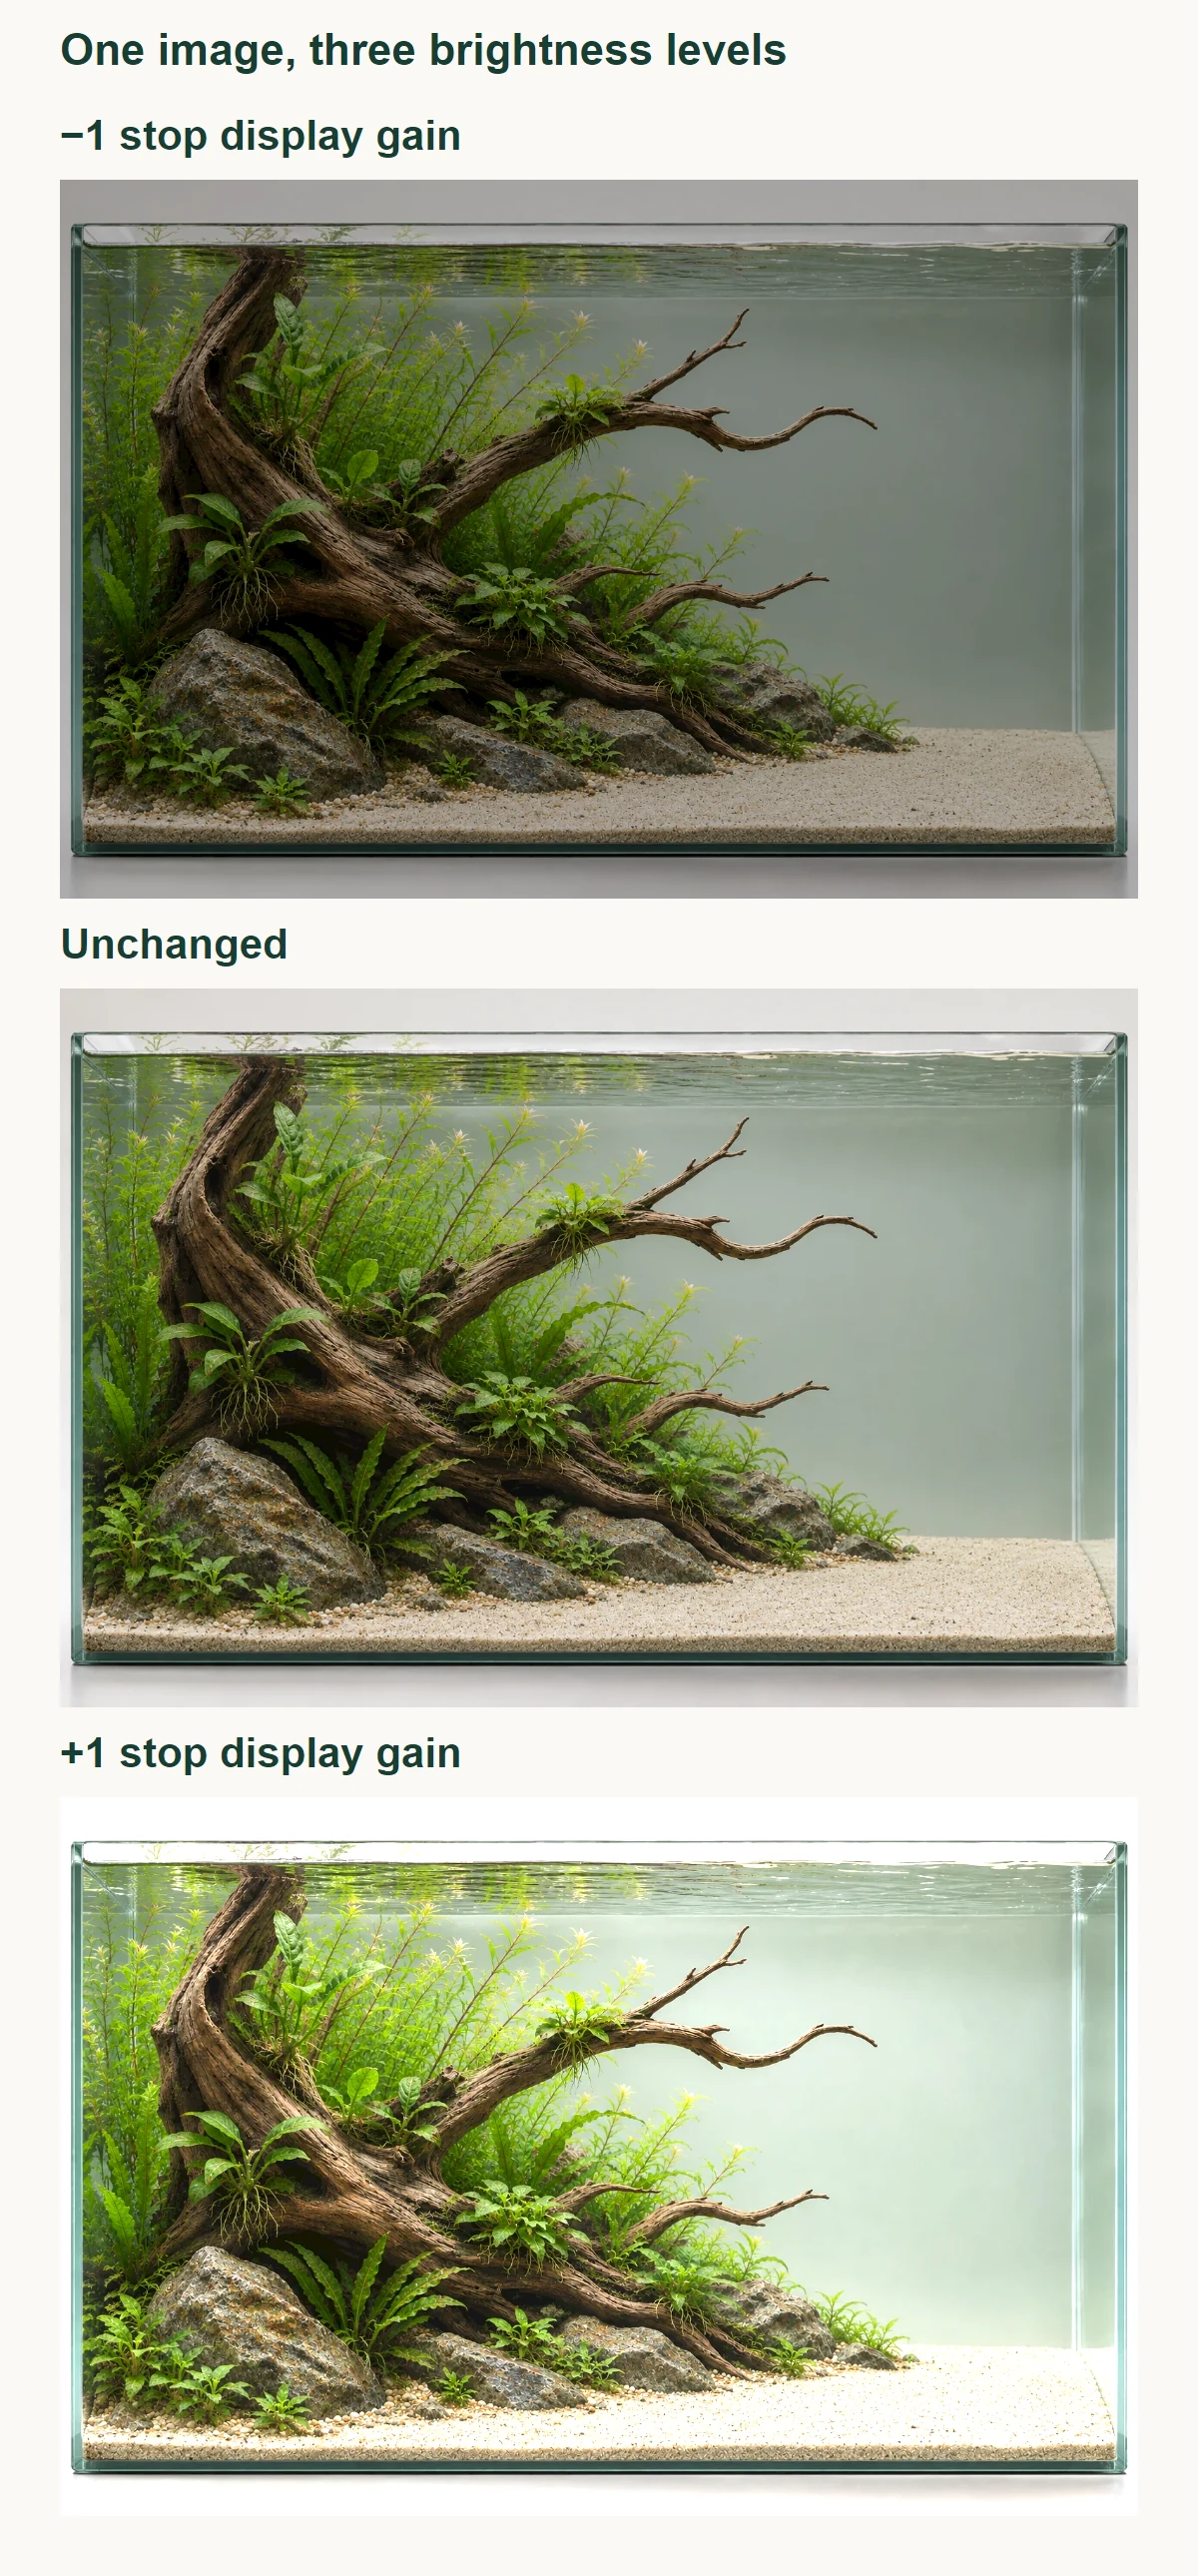
Work on a reasonably calibrated, color-managed display with automatic night tint and extreme display modes disabled. For ordinary web sharing, an embedded sRGB export is a practical choice; follow a contest’s explicit profile requirement if it specifies one. Convert the profile through the editor rather than merely relabeling the file. [color]
Make a faithful edit, then check the event rules
Keep a working copy and the untouched camera original. Correct the image to describe the real aquarium, not to invent a more successful one. Do not add fish, clone plants, remove equipment digitally or replace backgrounds with generated content in a contest submission. A set of separately captured focus frames is not the same thing as one camera exposure.
General editing capability is not contest permission. Cropping, geometric correction, HDR and sharpening must be checked against the named event and season. Our contest rule comparison records the checked 2026 differences; it is not a 2027 rulebook. AI-created teaching illustrations on this page are separate from an entrant’s real submission image. [iaplc] [aga] [eaplc]
Inspect the exported file, not just the editing window
- Set the required format and actual pixel dimensions. A DPI tag does not create missing pixels.
- Keep the intended aspect ratio and any required whole-aquarium boundary. Do not assume a crop is allowed.
- Embed the appropriate color profile and choose enough compression quality to retain fine leaves without exceeding the file limit.
- Reopen the exact export at 100%. Check small leaves, fish eyes, gradients, edge halos and block artifacts.
- Retain required metadata and original files. Remove only information that the event permits or requires you to omit, including identifying overlays.
- Confirm the actual uploaded filename, size and preview, then retain the submitted file and acknowledgment.
Export creates a separate finished file. Preserve your original and editing history, and avoid repeatedly recompressing an already compressed JPEG. A large file is not automatically a detailed file; the sharpness and color need to survive in the exact version you submit. [export]
A repeatable test session
Mark the tripod position, camera height and normal lighting state. Make a clean frontal frame with the aquarium functioning normally. Inspect alignment, reflections, focus, movement and highlights in that order. Change one cause, repeat the frame and keep the comparison. Write down the settings that worked for your equipment rather than treating another aquarium’s values as a recipe.
When the photograph is ready but the plant shapes are not, return to the final-shot preparation workflow. Improve the aquarium over time rather than trying to manufacture its missing detail in an editor.
Lesson completed!
You've finished Aquascape Photography: Camera Settings, Lighting & the Perfect Contest Shot. Continue learning or put this guidance into practice.
Continue learning →References
ADA — Aquarium photography, smartphone version. Checked November 4, 2026.
ADA — Aquarium photography, single-lens reflex camera version. Checked November 4, 2026.
Nikon — Understanding focal length. Checked November 4, 2026.
Canon — Depth of field. Checked November 4, 2026.
Nikon — Understanding maximum aperture. Checked November 4, 2026.
Canon — Camera-shake blur compensation. Checked November 4, 2026.
Nikon — Polarizing filters. Checked November 4, 2026.
Sony — Reducing camera flicker and banding. Checked November 4, 2026.
Adobe — Introduction to Camera Raw. Checked November 4, 2026.
Adobe — Color management in Lightroom Classic. Checked November 4, 2026.
Adobe — Export files from Lightroom Classic. Checked November 4, 2026.
IAPLC — 2026 guidelines and rules. Checked November 4, 2026.
AGA — Current general guidelines, checked for the 2026 season. Checked November 4, 2026.
EAPLC — 2026 application guidelines. Checked November 4, 2026.
The cover is an AI-created aquascape. Diagrams and labeled simulations by AquariumLesson.