
Contest Aquascaping: From Layout to the Final Photo
Build a display you can keep, then plan the photograph
The final photo brings together design choices, plant development and consistent care. Work toward observable readiness: healthy plants, clear group boundaries, a visible main structure and livestock behaving normally. A deadline cannot make an unstable aquarium ready.
This workflow connects composition, plant development and the camera session. Use Aquascaping Contests for event selection, publication restrictions and submission rules. Keeping those decisions separate helps you avoid rebuilding the aquarium to solve a camera problem.
Choose the event, category and main view early
Write a short brief describing the main mass, the opening and the planting character. Add the required photographic view and any publication restriction. A plant-centered Dutch composition, a habitat-specific biotope and a miniature landscape can all demand care and skill; they do not share one ideal silhouette or judging brief.
Before fixing heavy materials, make a frontal planning image from the intended camera position. Check what overlaps and what disappears. Leave useful maintenance access even where equipment will eventually be visually screened. The depth lesson explains why a route visible from above can vanish from the seated or camera view.
Study documented work for a specific decision rather than a layout to copy. In the AGA’s Dutch example Colorful world, compare the neighboring plant textures and group boundaries. In the 2026 EAPLC examples, follow the relationship between hardscape, planted surfaces and open space. Their official pages establish the entries’ provenance; the images are not licensed to us simply because they are publicly viewable.
Select plants for their maintained role
For each group, record its growth form, expected maintained outline, light and CO₂ needs, and the route needed to trim or remove it. Match the plant to the system before choosing it for leaf color. A small cup of plants does not show the space an established group will occupy.
Separate the background’s main outline from small accents. An accent that constantly needs cutting back to stop it becoming the largest object is a poor fit for that position. Use midground planting, epiphytes and moss care to investigate the actual growth forms. Do not treat a fixed number of species as a quality requirement.
Keep the biological and technical foundation stable
Complete appropriate cycling and livestock planning before treating the aquarium as ready. Evaluate filtration, oxygenation and circulation around the real hardscape. Neither clear water nor an attractive carpet proves biological readiness.
Keep lighting, nutrient management and any CO₂ supply appropriate to the planting and inhabitants. Track changes and actual observations. A photo deadline is not a reason to sharply raise light, change dosing or increase injection to force color or growth. If plants decline, investigate their conditions before reshaping them for appearance.
Use the existing lighting, fertilizer, flow and CO₂ troubleshooting lessons for the underlying care decisions. This workflow does not add a separate contest dosing recipe.
Use what you learn in My Aquariums
Follow a new aquarium through cycling or see how water readings and care change over time in an established setup.
Learn the recovery pattern of your own planting
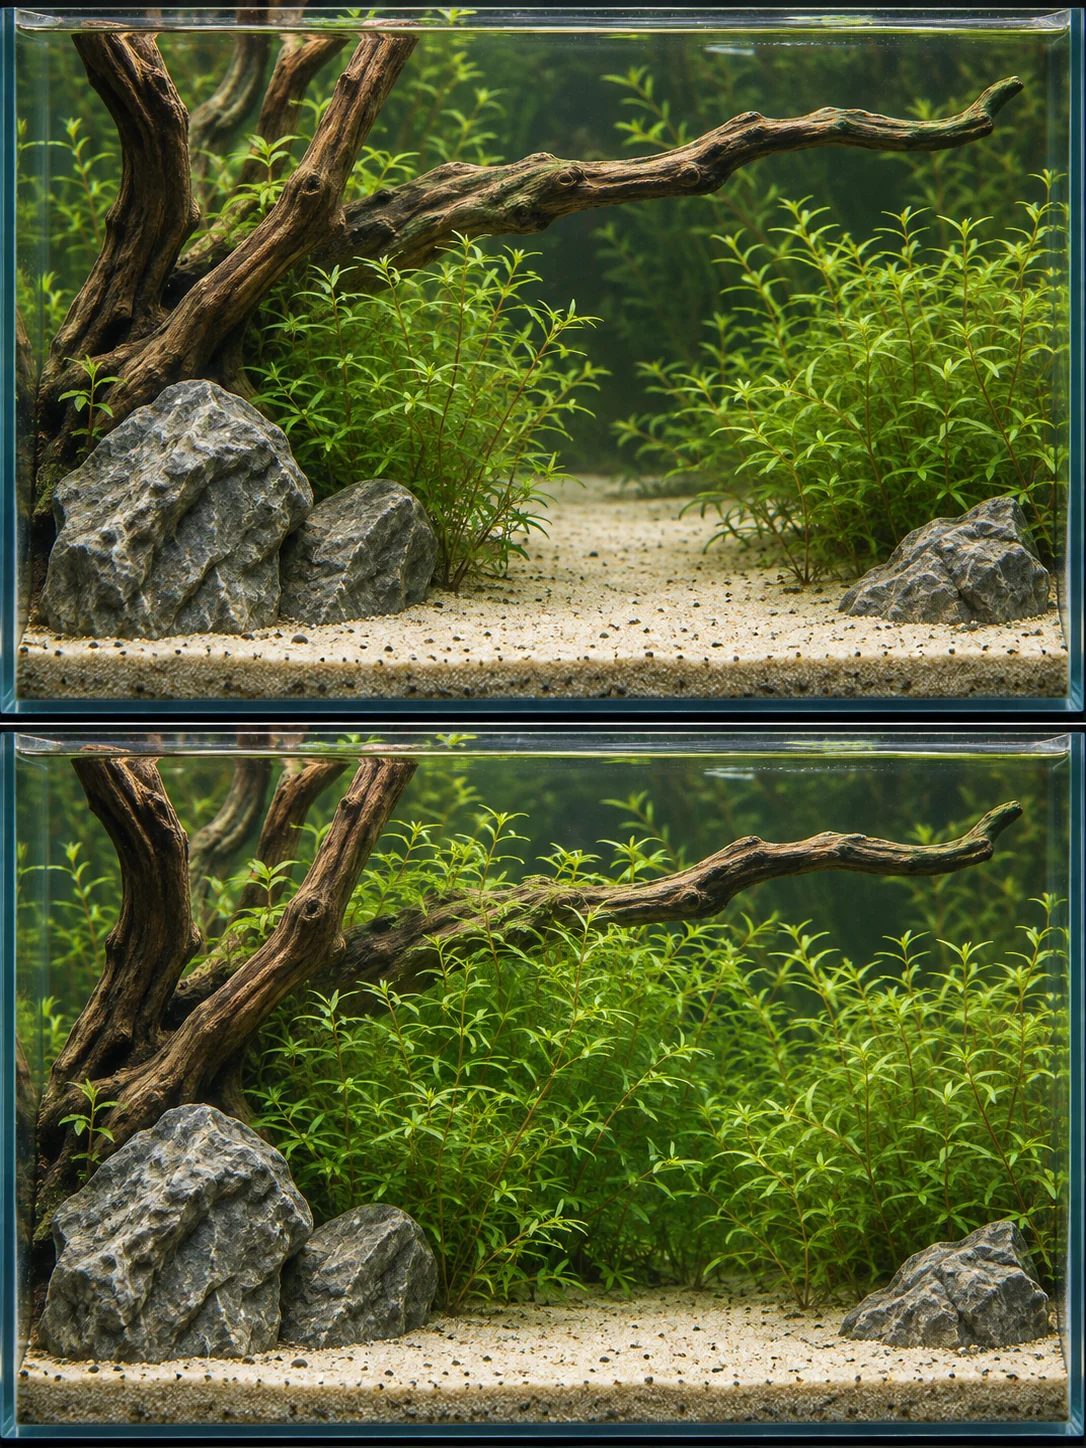
Well before a planned submission, photograph a group before a normal appropriate trim, immediately afterward and when its new outline looks settled again. Record what you actually did and the observed interval. Keep the camera position and normal lighting comparable. That small record is more useful than assuming every plant will look its best seven days after cutting.
Stem plants can branch or be replanted from suitable tops; rosettes are usually managed by selecting leaves or plants; runners can invade neighboring groups; slow rhizome plants need selective thinning. Moss requires collection of loose fragments. Use plant-specific methods and inspect the remaining group rather than applying one horizontal cut to everything. [trim]
Distinguish healthy density from a group that has lost its intended boundary. Restore a view by managing the relevant edge, not automatically removing most of the planting. The mistakes lesson shows how growth can close the same opening without any change to the hardscape.
Use readiness gates instead of a fixed countdown
| Stage | What to check | Continue when |
|---|---|---|
| Long-term development | Plant choice, stable care, safe structure and access | The system supports the design without emergency corrections |
| Several weeks before a possible session | Photograph the main outline and rehearse relevant trimming | You know how the groups respond under your conditions |
| One or two weeks before, if useful for those plants | Check visible hardscape, group separation and new growth | Further work can stay small and appropriate |
| A few days before | Check glass, background, framing and export requirements | A test frame reveals no major care or structural problem |
| The day before | Prepare camera, files and reversible room-light controls | You can shoot without rushing a disruptive aquarium change |
| On the day | Observe livestock and inspect the real test frame | The aquarium is behaving normally and the image is technically usable |
These are planning windows, not promises of recovery. A slow-growing attachment group and a vigorous stem group do not follow the same schedule. If a substantial replant, instability or health concern remains, choose a later session or skip that event.
Review the outlines that matter
Start with the view that carries the design. Can you still see the wood junction, the opening or the smaller rear group you planned? Compare the current frame with your earlier design image before moving materials. Decide whether the missing feature is a plant boundary, a camera-height difference or a genuine structural problem.
Then inspect texture and color relationships. Two healthy groups can merge when their maintained shapes, tones and leaf sizes are too similar from the main view. A small change in one group may be enough. Do not chase redder leaves by stressing plants or changing the whole system immediately before photographing it.
Read one composition as a set of relationships
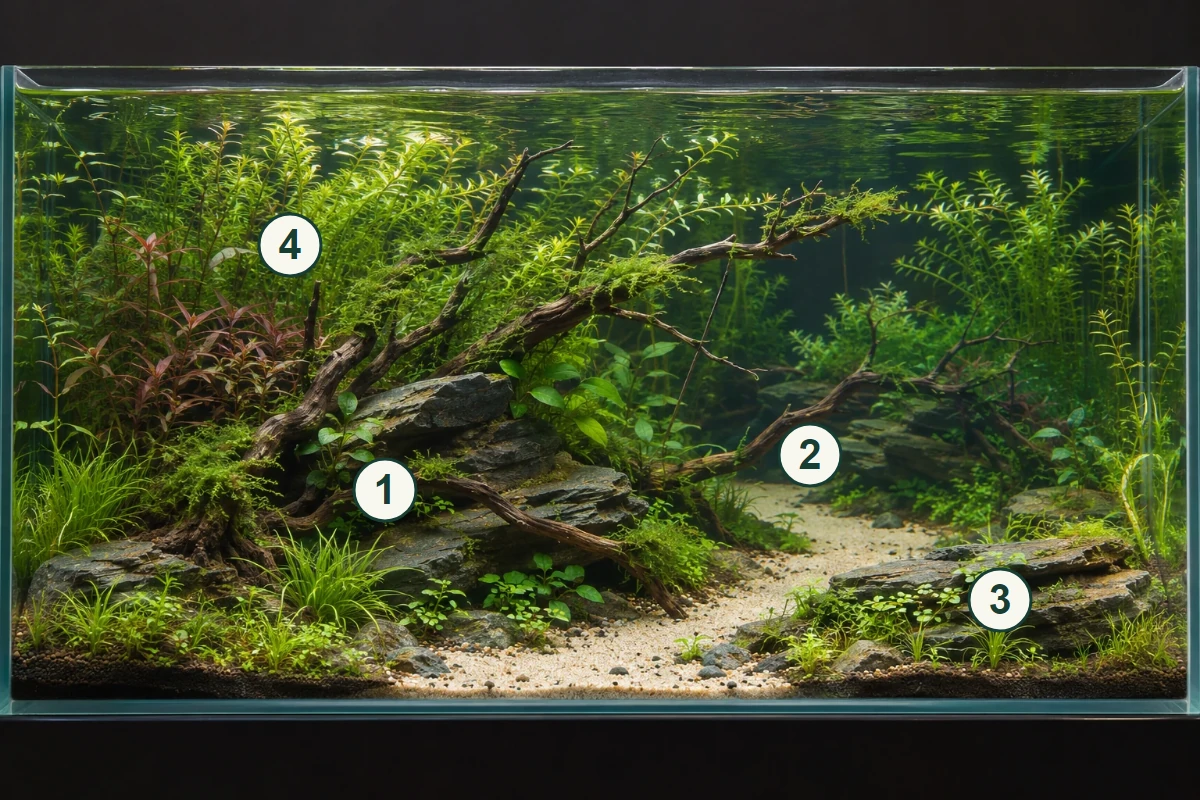
- 1 · Main mass. The higher left wood-and-stone group establishes the main direction. Its visible structure matters more than adding another equally large accent.
- 2 · Rear opening. A partial view beyond the nearer branches gives the eye somewhere to continue. Keep enough of that route visible as the planting widens.
- 3 · Supporting shelf. The lower right group repeats the material character without matching the main group’s height. Its role is relational, not a compulsory proportion.
- 4 · Plant boundary. Different leaf textures and a restrained color contrast separate the planted surfaces. Review the boundaries from the actual camera position.
Keep the hardscape safe. A load-bearing stone is not a convenient last-minute design adjustment. Plan any structural work around the aquarium, its inhabitants and the actual support requirements, not the photograph alone.
Prepare surfaces and backgrounds without shortcuts
Clean appropriate glass surfaces and remove loose trimming debris through normal safe care. Inspect the view from the camera, because a small smear or reflected cable may be obvious there even when it is invisible from above. Give disturbed particles time to settle through the aquarium’s normal operation.
A surface film or persistent cloudiness needs its cause assessed. Do not add a new chemical, perform an unusually disruptive intervention or introduce animals as a quick cleanup service for the camera. Follow your aquarium’s safe water-change practice rather than a universal contest percentage.
Choose a suitable external background and control room reflections. Keep ventilation, electrical safety and access to the aquarium intact. Before hiding a piece of equipment behind plants, check whether it can still work and be serviced.
Keep equipment changes reversible and safe
Leave essential filtration, circulation, heating and gas exchange functioning unless a specific short interruption has been assessed as safe for that aquarium and equipment. There is no universal safe photo pause. A staged instruction to remove every device is not a care plan, particularly for a warm or heavily stocked display.
Prefer solving glare and framing without disturbing the aquarium. If a qualified equipment-specific procedure is necessary, plan the exact restoration and check it immediately afterward. Never leave an external filter in an unsafe state, expose a heater improperly or forget to restore the system after shooting.
Run the session as a sequence of small checks
- Position and level the supported camera. Match the required front view.
- Set the normal aquarium lighting and shade unwanted room reflections.
- Check focus across the important layers.
- Choose exposure for the movement that matters, then inspect highlights and color.
- Make a test frame and inspect real pixels, including fish eyes and fine leaves.
- Make a short sequence of separate photographs as the inhabitants move naturally.
- Select a faithful individual frame. Do not assemble a better school of fish from several images.
- Restore any safely changed equipment or room setup and verify normal aquarium operation.
Use the photography lesson for shutter, aperture, ISO, LED banding and color-management decisions. If a test reveals a soft rear group or reflected window, correct that cause rather than begin a last-minute rescape.
Keep the originals, edit within the named rules
Work on a copy and retain the camera originals, the editing record and the exact export. Check the event and season before cropping, correcting geometry or using multi-frame techniques. A tool being available in your editor does not mean the event permits it.
The rules comparison in Aquascaping Contests records the checked 2026 season. For a later season, open the official pages again. Distinguish your real submission photograph from our AI-created illustrations and from labeled technical simulations: their purposes and permissions are different.
Inspect the submission, then keep caring for the aquarium
Reopen the exact exported file. Confirm the required aquarium view, pixel dimensions, file format and size, color profile, permitted editing and any anonymity requirement. Compare the uploaded preview with that file and keep the acknowledgment the organizer provides.
Continue the aquarium’s ordinary care after the session. The photograph is one view at one time, not the end of the project. When feedback arrives, separate a husbandry problem, a composition observation and a photographic flaw. Choose one useful question to work on next rather than treat a ranking as an instruction to rebuild everything.
What makes the next attempt more useful?
Keep a short record of the design intention, the plant response and the camera setup. A specific conclusion—“the opening disappeared as this group widened”—can guide the next trim or planting choice. “It needed more drama” cannot tell you what to do safely or why it would help.
An ambitious contest aquascape brings its composition, plant development and photograph into agreement. Its strongest image should describe an aquarium that remains worth maintaining when the camera is put away.
Lesson completed!
You've finished Contest Aquascaping: From Layout to the Final Photo. Continue learning or put this guidance into practice.
Continue learning →References
Tropica — Trimming different growth forms. Checked November 4, 2026.
AGA 2023 — Colorful world, entry 692, documented Dutch-style example. Checked November 4, 2026.
EAPLC — 2026 official results and judging comments. Checked November 4, 2026.
ADA — Fine Summer Breeze, documented layout and plant-size decisions. Checked November 4, 2026.
The cover is an AI-created aquascape illustration. Planning diagrams do not document a real aquarium’s growth.