Aquarium CO₂ Diffuser Guide: Placement, Types & Flow
Introduction
An aquarium CO2 diffuser is the part of a planted tank CO₂ system that turns pressurized gas into tiny bubbles, mist, or dissolved carbon dioxide that plants can use. It may look like a small accessory, but it has a major effect on plant growth, algae control, CO₂ efficiency, livestock safety and overall aquascape stability.
A good diffuser does not simply release bubbles. It helps dissolve and distribute CO₂ throughout the aquarium. If the diffuser is too small, dirty, poorly placed or sitting in weak flow, much of the CO₂ may rise straight to the surface and escape. The bubble counter may show gas moving, but plants may still be carbon-limited.
This is why CO₂ diffuser placement matters as much as the bubble rate itself. A beautiful high-tech aquascape can still struggle if CO₂ does not reach the carpet, dense stem groups, shaded areas and slow-flow zones. On the other hand, pushing more gas into a poorly distributed system can stress fish and shrimp without fixing the real problem.
This guide explains the main types of aquarium CO₂ diffusers, how to place them, how inline diffusers differ from in-tank ceramic diffusers, how flow affects CO₂ distribution, how to clean a diffuser, and how to troubleshoot blue drop checkers, algae, poor plant growth and livestock stress. For the complete equipment setup, start with the Aquarium CO2 System Guide. If you are still tuning gas output, read the CO₂ Bubble Rate Guide and CO₂ Drop Checker Guide.
Quick answer: Place an aquarium CO₂ diffuser low in the tank and in a strong flow path so fine bubbles travel across the aquarium instead of rising straight to the surface. Choose an in-tank diffuser for simple visual control, an inline diffuser for a cleaner aquascape, or a reactor when you want maximum dissolution with minimal mist.
What You’ll Learn in This Lesson
- What a CO₂ diffuser does in a planted aquarium
- Why bubble size and flow matter for CO₂ efficiency
- The difference between ceramic diffusers, inline diffusers, atomizers and reactors
- Where to place a CO₂ diffuser for better distribution
- How diffuser placement affects drop checker readings
- How to clean a clogged ceramic diffuser safely
- How to troubleshoot poor plant growth despite visible CO₂ bubbles
- How to improve CO₂ distribution without gassing fish or shrimp
What Does an Aquarium CO₂ Diffuser Do?
An aquarium CO₂ diffuser breaks pressurized carbon dioxide into small bubbles or fine mist. Smaller bubbles have more surface area relative to volume, which helps CO₂ dissolve into the water more efficiently before it escapes at the surface.
The diffuser is not the only part of the CO₂ system. The regulator controls pressure, the needle valve controls flow, the bubble counter shows injection rate, the check valve protects equipment from back-siphoning, and the drop checker helps estimate dissolved CO₂. But the diffuser is the part that actually delivers gas into the aquarium water.
A good diffuser helps with:
- Breaking CO₂ into smaller bubbles
- Improving gas dissolution
- Distributing CO₂ through the water column
- Reducing wasted CO₂
- Supporting carpets and dense plant groups
- Making CO₂ tuning more predictable
- Reducing uneven growth caused by carbon dead zones
A poor diffuser, clogged diffuser or badly placed diffuser can make the whole system look active while plants still receive too little usable carbon.
Ready to set up your own aquarium?
Save this lesson and keep plant care guidance connected to your aquarium setup.
Why CO₂ Diffusion Matters for Plant Growth
In planted aquariums, CO₂ is one of the main growth drivers. Light provides energy, fertilizers provide nutrients, and CO₂ provides carbon. When light is strong, plants need more carbon to use that energy. If CO₂ is too low or unstable, algae often appears and demanding plants struggle.
The diffuser matters because injected gas must become plant-available. If bubbles are large and rise quickly, much of the CO₂ may escape before dissolving. If the diffuser is placed in a weak-flow corner, CO₂ may stay local instead of reaching the whole tank. If dense hardscape blocks circulation, one side of the aquarium may be rich in CO₂ while another side remains limited.
Good CO₂ diffusion helps create:
- More stable plant growth
- Better carpeting plant performance
- Stronger stem plant tops
- More predictable pearling in high-tech tanks
- Less carbon-related algae pressure
- More efficient use of injected gas
- Lower need to simply increase bubble rate blindly
If plants only grow well near the diffuser, the problem is usually distribution, not total CO₂ supply. Review flow with the Aquarium Filter Flow Guide before increasing gas aggressively.
Main Types of Aquarium CO₂ Diffusers
There are several ways to diffuse CO₂ in a planted aquarium. Each method has strengths and weaknesses. The best choice depends on tank size, equipment, aquascape style, maintenance tolerance and how clean you want the display to look.
| CO₂ Delivery Type | Best For | Main Trade-Off |
|---|---|---|
| In-tank ceramic diffuser | Beginner and medium planted tanks | Visible in the aquarium and needs regular cleaning |
| Inline CO₂ diffuser | Canister-filter tanks and clean aquascapes | Requires cutting into filter return hose |
| CO₂ atomizer | Fine mist and efficient distribution | Often needs higher pressure and may create visible mist |
| CO₂ reactor | Large tanks and high dissolution efficiency | Bulkier and more technical to install |
| Ladder diffuser | Simple low-pressure or DIY systems | Less elegant and often less efficient |
| Filter intake injection | Some DIY or compact setups | Can be noisy or risky for filter performance |
Most aquarists start with an in-tank ceramic diffuser because it is affordable and easy to see. More advanced aquascapers often move to inline diffusers or reactors to keep equipment out of the display.
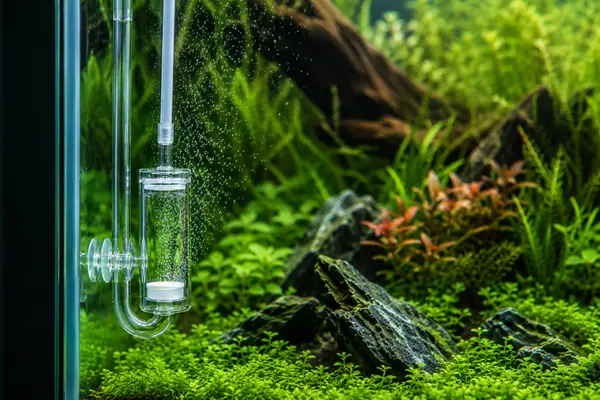
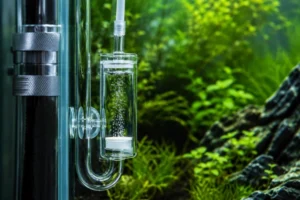
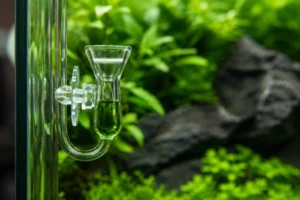
In-Tank Ceramic CO₂ Diffusers
An in-tank ceramic diffuser is the classic planted aquarium CO₂ diffuser. It usually has a ceramic disc or membrane that forces CO₂ into many tiny bubbles. It is placed inside the aquarium and connected to CO₂ tubing from the regulator.
The biggest advantage is visibility. You can see whether bubbles are forming, whether the diffuser is clogged and whether the mist is being carried by flow. This makes ceramic diffusers beginner-friendly.
The main disadvantages are appearance and cleaning. A diffuser inside the tank is visible, and ceramic pores slowly clog with algae, biofilm and mineral deposits. As it clogs, bubbles become larger and diffusion becomes less efficient.
| Strength | Weakness | Best Use |
|---|---|---|
| Easy to install | Visible in the tank | Beginner CO₂ systems |
| Easy to monitor visually | Needs regular cleaning | Small to medium planted tanks |
| Affordable | Can create visible mist | Tanks where equipment visibility is acceptable |
| Good for learning CO₂ behavior | Can be inefficient if placed poorly | First high-tech planted tank setups |
If you are new to pressurized CO₂, an in-tank diffuser is often the easiest way to learn what your CO₂ system is doing.
Inline CO₂ Diffusers
An inline CO₂ diffuser is installed outside the aquarium, usually on the return hose of a canister filter. Instead of placing the diffuser inside the display, CO₂ is injected into the filter return line and carried into the aquarium with the outgoing water.
The major advantage is a cleaner aquascape. There is no glass diffuser visible in the tank, and CO₂ can be distributed through the filter outlet. This is popular in rimless aquascapes where equipment visibility matters.
The main downside is installation complexity. Inline diffusers require correct hose size, secure connections, leak-free installation and enough working pressure. They are also less visually immediate because you cannot always see the ceramic membrane working inside the cabinet.
| Strength | Weakness | Best Use |
|---|---|---|
| Keeps display cleaner | Requires canister filter hose installation | Rimless and aquascaped tanks |
| Can distribute CO₂ through return flow | Can reduce filter flow if dirty or poorly sized | Medium to large planted tanks |
| No in-tank diffuser equipment | Harder to visually inspect | Clean cabinet-based setups |
| Often efficient when sized correctly | Needs secure hose connections | High-tech aquascapes with external filtration |
Inline diffusers are excellent when you already use a canister filter and want a minimal display. They are less ideal for sponge-filter tanks, small HOB-filter setups or aquariums where external plumbing is inconvenient.
CO₂ Atomizers
A CO₂ atomizer is designed to create extremely fine bubbles or mist. Atomizers can be internal or inline. They often require higher pressure than standard ceramic diffusers, but they can produce very fine CO₂ mist when set up correctly.
Fine mist can be useful because small bubbles travel through the tank and dissolve gradually. Some aquascapers like this visible CO₂ mist because it shows distribution. Others dislike the look because the aquarium can appear slightly cloudy with microbubbles during the photoperiod.
- Atomizers often need higher working pressure.
- They can produce very fine bubbles.
- Inline atomizers keep equipment out of the display.
- Internal atomizers are easier to see and inspect.
- They may create visible mist in the aquarium.
- They still need cleaning and stable flow.
An atomizer is best for aquarists who want fine mist and are comfortable with pressure requirements and maintenance.
CO₂ Reactors
A CO₂ reactor is designed to dissolve CO₂ more completely before it reaches the aquarium. Instead of releasing a cloud of bubbles into the display, the reactor keeps gas in contact with flowing water long enough for more CO₂ to dissolve.
Reactors are often used on larger tanks, high-demand systems or aquariums where visible mist is unwanted. They can be highly efficient, but they are larger and more technical than simple diffusers.
A reactor can be useful when:
- The aquarium is large
- You want minimal visible CO₂ mist
- You use a canister filter or external plumbing
- You want high dissolution efficiency
- You are comfortable with more complex installation
- You can maintain flow and prevent gas buildup inside the reactor
The trade-off is complexity. A reactor may reduce flow if undersized or clogged, and installation must be secure. For many beginner tanks, a diffuser is simpler. For large high-tech tanks, a reactor can be a serious upgrade.
CO₂ Diffuser vs Reactor vs Atomizer
The best CO₂ delivery method depends on your aquarium. A small beginner planted tank does not need the same equipment as a large high-tech aquascape. The table below summarizes the practical differences.
| Method | Visibility | Efficiency | Complexity | Best For |
|---|---|---|---|---|
| In-tank diffuser | Visible | Good if clean and well placed | Low | Beginners, small and medium tanks |
| Inline diffuser | Hidden | Good to high | Medium | Canister-filter aquascapes |
| Atomizer | Internal or hidden | High mist production | Medium | Fine bubble distribution |
| Reactor | Hidden | Very high dissolution | Medium to high | Large tanks and mist-free setups |
| Ladder diffuser | Visible | Low to moderate | Low | Simple or low-pressure systems |
If you value simplicity, choose an in-tank diffuser. If you value clean aesthetics, choose an inline diffuser. If you value maximum dissolution and minimal mist, consider a reactor.
Where to Place a CO₂ Diffuser
CO₂ diffuser placement should help bubbles stay underwater longer and travel through the aquarium. A diffuser placed low in the tank gives bubbles more time to rise, dissolve and get carried by flow. A diffuser placed in a strong flow path helps CO₂ reach more plant zones.
A common placement is low on one side of the aquarium, near or beneath the filter outflow path. The goal is for the current to push fine bubbles across the tank and downward through the plant mass rather than letting them rise straight up.
Good placement principles:
- Place the diffuser low in the aquarium.
- Use filter flow to carry bubbles across the tank.
- Avoid areas where bubbles rise straight to the surface.
- Avoid dead zones behind hardscape or dense plants.
- Keep the diffuser accessible for cleaning.
- Place the drop checker away from direct bubbles.
- Observe whether mist reaches the whole tank, not just one corner.
Good placement is not about hiding the diffuser first. It is about making CO₂ available to plants safely and efficiently.
Best CO₂ Diffuser Placement With Filter Flow
Filter flow is the delivery system for CO₂. Even the best diffuser performs poorly if the aquarium has weak circulation. CO₂-rich water must move across the tank, around hardscape, through carpets, between stems and into shaded zones.
In many canister-filter layouts, a lily pipe or spray bar creates a circular flow pattern. The diffuser can be placed where bubbles enter that current and travel across the aquarium. In smaller tanks with internal filters or HOB filters, the principle is the same: place the diffuser where outgoing flow can carry the bubbles.
| Flow Setup | Diffuser Placement Idea | Why It Helps |
|---|---|---|
| Canister filter with lily pipe | Low on the opposite or flow-catching side | Bubbles can circulate with the main current |
| Spray bar across back glass | Low below or opposite the flow path | CO₂ mist can be pushed through the tank length |
| HOB filter | Low where return flow can pull or push bubbles | Prevents bubbles from simply rising in one corner |
| Internal filter | Near the outflow but not sucked directly into the impeller | Uses filter current for distribution |
| Long tank | Place for full-length circulation | Prevents one CO₂-rich end and one CO₂-poor end |
| Dense hardscape tank | Adjust around blocked zones | Hardscape can create CO₂ shadows |
If your drop checker is green but one plant group still struggles, the diffuser may be working locally while CO₂ distribution remains uneven.
Where Not to Place a CO₂ Diffuser
Some diffuser positions waste CO₂ or create misleading readings. A diffuser placed too high gives bubbles little time to dissolve. A diffuser placed behind thick hardscape may trap CO₂ in one area. A diffuser placed directly under the drop checker may make the checker look greener than the tank really is.
Avoid these placements:
- Directly at the surface
- In a dead corner with weak flow
- Behind rocks or wood where bubbles cannot escape into circulation
- Directly under the drop checker
- Where fish constantly disturb or knock it loose
- Where maintenance tools will hit it every water change
- Where bubbles enter the filter intake aggressively and cause noise or air locking
- Where the diffuser is impossible to remove for cleaning
Placement should be practical. The diffuser should support flow, stay secure, remain cleanable and give a representative CO₂ distribution pattern.
CO₂ Diffuser Size: How Big Should It Be?
CO₂ diffuser size should match aquarium volume and CO₂ demand. A tiny diffuser may work well in a nano tank but struggle in a larger aquarium. A diffuser that is too small may require high pressure, produce uneven bubbles or limit flow through the ceramic membrane.
Manufacturers often provide tank-size recommendations. Use them as a starting point, then judge real performance based on bubble quality, drop checker response, pH trend, plant growth and livestock behavior.
| Aquarium Size | Diffuser Consideration | Practical Note |
|---|---|---|
| Nano tank | Small diffuser or compact atomizer | Start CO₂ very conservatively |
| Small to medium tank | Standard ceramic diffuser often works | Placement and cleaning are critical |
| Medium to large tank | Larger diffuser, inline diffuser or atomizer | Flow distribution becomes more important |
| Large high-tech tank | Inline diffuser or reactor may be better | Bubble counting becomes less meaningful alone |
| Very long tank | Distribution may matter more than diffuser size | Consider flow pattern and outlet placement |
A bigger diffuser is not always the answer. A correctly sized diffuser in good flow is better than a large diffuser in a dead zone.
Fine Mist vs Large Bubbles
Fine mist is usually better than large bubbles because smaller bubbles dissolve more easily and stay suspended longer. Large bubbles rise quickly and often waste CO₂ at the surface.
If a ceramic diffuser starts producing larger bubbles than before, it is often dirty or partially clogged. Biofilm, algae and minerals block pores, forcing gas through fewer openings. This creates bigger bubbles and reduces efficiency.
Fine mist usually indicates:
- Cleaner ceramic pores
- Better diffusion surface
- More even gas release
- More time for CO₂ to dissolve
- Better chance of whole-tank distribution
Large bubbles may indicate:
- A clogged diffuser
- Low-quality ceramic membrane
- Too little working pressure
- Damaged diffuser surface
- Incorrect tubing or connection issues
- Gas escaping from a crack or poor seal
If bubble quality suddenly changes, clean or inspect the diffuser before increasing the bubble rate.
How to Clean a CO₂ Diffuser
CO₂ diffusers need cleaning because ceramic pores gradually clog. A dirty diffuser produces larger bubbles, requires more pressure and becomes less efficient. Cleaning restores fine mist and makes CO₂ tuning more predictable.
Always remove the diffuser from the aquarium before cleaning. Never pour cleaning chemicals into the tank, and never return a diffuser until it is fully rinsed and safe.
Basic Cleaning Routine
- Turn off CO₂ at the solenoid or regulator.
- Disconnect the diffuser carefully.
- Remove the diffuser from the aquarium.
- Soak the ceramic part in an appropriate cleaning solution according to product guidance.
- Rinse thoroughly with clean water.
- Use dechlorinated water for the final rinse if needed.
- Do not scrub ceramic discs aggressively because they can break or clog further.
- Reconnect the diffuser securely.
- Check for leaks and bubble quality after restarting CO₂.
If you use bleach or strong cleaning products, be extremely careful. Any residue can harm fish, shrimp and beneficial bacteria. Many aquarists prefer to keep a spare diffuser so one can soak and rinse fully while the other stays in use.
How Often Should You Clean a CO₂ Diffuser?
Cleaning frequency depends on algae growth, water hardness, diffuser quality, CO₂ pressure and maintenance routine. Some diffusers need cleaning every few weeks. Others stay usable for months. The best sign is bubble quality.
Clean the diffuser when:
- Bubbles become larger than usual
- Mist becomes uneven across the ceramic surface
- CO₂ pressure rises but output looks weaker
- The drop checker stays blue despite normal bubble rate
- Algae or biofilm covers the ceramic disc
- The diffuser looks brown, green or cloudy
- Plants show CO₂ limitation after earlier stability
Do not wait until the diffuser is completely clogged. A lightly maintained diffuser is easier to clean than a neglected one.
CO₂ Diffuser and Drop Checker Placement
The diffuser and drop checker should not be placed too close together. The drop checker should estimate dissolved CO₂ in the aquarium, not directly read a stream of bubbles from the diffuser.
A common approach is to place the drop checker on the opposite side of the tank from the diffuser or in a representative plant zone. This helps show whether CO₂ is reaching across the aquarium. However, placement depends on flow pattern and aquascape layout.
- Keep the drop checker away from direct CO₂ bubbles.
- Use proper 4 dKH indicator solution.
- Allow time for the drop checker to react.
- Move it temporarily if you suspect CO₂ dead zones.
- Do not judge distribution from one fixed location forever.
- Use plant response and algae patterns alongside the color.
If the drop checker is green near the diffuser but plants on the other side struggle, the tank may have poor CO₂ distribution. Read the CO₂ Drop Checker Guide for detailed interpretation.
CO₂ Diffuser and Bubble Rate
The diffuser affects how much of your injected CO₂ actually becomes useful. A high bubble rate through a dirty or poorly placed diffuser may deliver less plant-available CO₂ than a lower bubble rate through a clean diffuser in good flow.
This is why bubbles per second should never be used alone. If the drop checker stays blue, the solution is not always “add more bubbles.” You may need to clean the diffuser, move it, improve circulation, reduce surface agitation or adjust timing.
| Symptom | Possible Diffuser Issue | Better First Check |
|---|---|---|
| High bubble rate but low CO₂ reading | Bad diffusion or poor placement | Clean diffuser and improve flow |
| Large bubbles | Clogged or damaged ceramic | Clean or replace diffuser |
| Mist only stays in one corner | Weak circulation | Adjust filter outflow |
| Fish stress near diffuser | Localized high CO₂ | Improve distribution and reduce gas |
| Bubble rate unstable | Regulator or needle valve issue | Check equipment before blaming diffuser |
Use the CO₂ Bubble Rate Guide to tune output gradually and safely.
CO₂ Diffuser and Surface Agitation
Surface agitation affects CO₂ because it increases gas exchange. Too much surface agitation can drive off injected CO₂ quickly. Too little surface movement can reduce oxygen exchange and increase livestock risk.
A planted CO₂ tank usually benefits from a gentle surface ripple. This supports oxygen exchange while still allowing CO₂ levels to build during the photoperiod. A completely still surface is not automatically better, especially in heavily stocked or high-growth tanks.
| Surface Movement | CO₂ Effect | Practical Advice |
|---|---|---|
| Very still surface | Conserves CO₂ | May reduce oxygen exchange |
| Gentle ripple | Balanced gas exchange | Good default for planted CO₂ tanks |
| Strong splashing | Drives off CO₂ faster | May require more CO₂ or flow adjustment |
| Air stone during CO₂ period | Can reduce CO₂ efficiency | Usually not needed during lights-on injection |
| Night aeration | Improves oxygen after lights out | Useful in some dense high-tech tanks |
Do not remove all surface movement just to save CO₂. Fish and shrimp safety matters more than gas efficiency.
CO₂ Diffuser for Low-Tech Aquariums
Many low-tech aquariums do not need pressurized CO₂ at all. Easy plants can grow without injection if light is moderate and nutrients are stable. However, some aquarists use gentle CO₂ in low-tech or medium-tech tanks to improve growth without pushing a full high-tech system.
For these tanks, diffuser choice should be simple and conservative. A small in-tank diffuser is often enough. The goal is stable support, not maximum gas injection.
- Use a smaller diffuser matched to tank volume.
- Start with a low bubble rate.
- Keep lighting moderate.
- Use a drop checker for guidance.
- Watch fish and shrimp carefully.
- Do not chase high-tech plant speed without high-tech maintenance.
- Keep fertilizer available but not excessive.
If you are not injecting CO₂, choose lower-demand plants and lighting. The Aquarium PAR Explained guide can help match light intensity to plant demand.
CO₂ Diffuser for High-Tech Aquascapes
High-tech aquascapes need more reliable CO₂ diffusion because plant demand is higher. Strong light, dense stem growth, carpeting plants, red plants and frequent trimming all increase carbon demand.
In high-tech tanks, diffuser performance should be judged by distribution, stability and plant response. A diffuser that looks active but creates uneven CO₂ zones will still cause problems.
- Use a diffuser or reactor sized for the aquarium.
- Keep ceramic membranes clean.
- Place the diffuser in a strong flow path.
- Use a drop checker and pH trend carefully.
- Watch carpets and dense stems for CO₂ limitation.
- Keep macros and micros available so plants can use CO₂.
- Trim dense growth to prevent dead zones.
- Prioritize livestock safety over maximum plant speed.
High-tech CO₂ only works when light, nutrients, flow and maintenance match the system. If algae appears after increasing light or CO₂, review Aquarium Lighting and Algae.
Signs Your CO₂ Diffuser Is Working Well
A good diffuser setup creates stable, even CO₂ availability without stressing livestock. You should see fine bubbles or efficient dissolution, stable drop checker behavior, healthy plant response and normal fish behavior.
Signs of good diffuser performance include:
- Fine, consistent bubbles or mist
- Drop checker gradually reaching green during the photoperiod
- Plants growing evenly across the aquarium
- Carpets staying compact instead of stretching upward
- Stem plant tops looking healthy after trimming
- Less algae in previously CO₂-limited areas
- No fish gasping or shrimp stress
- Stable bubble rate after tuning
- No obvious CO₂ dead zones behind hardscape
The best sign is not just visible bubbles. The best sign is stable growth across the whole tank.
Signs Your CO₂ Diffuser Is Not Working Properly
A diffuser can fail gradually. It may still produce bubbles, but those bubbles may be too large, too localized or poorly distributed. Plants may show CO₂ limitation even though the bubble counter is active.
Warning signs include:
- Large bubbles instead of fine mist
- Uneven bubbles from only one part of the ceramic disc
- Bubbles rising straight to the surface
- Drop checker staying blue despite normal bubble rate
- Plants pearling only near the diffuser
- Algae appearing in one flow-dead zone
- Stem tops becoming small or weak
- Carpets stalling despite strong light
- Fish stressed near a concentrated CO₂ area
- Regulator pressure increasing while output weakens
If these signs appear, clean and reposition the diffuser before simply increasing CO₂. More gas through a bad setup can make the tank less safe without solving plant growth.
Common CO₂ Diffuser Mistakes
Most diffuser mistakes come from treating CO₂ as a bubble-rate problem only. In reality, diffusion, placement, flow, timing and livestock safety all matter.
| Mistake | Why It Causes Problems | Better Approach |
|---|---|---|
| Placing the diffuser too high | Bubbles escape quickly | Place it low in the tank |
| Putting it in a dead zone | CO₂ stays local and plants elsewhere suffer | Use the main flow path |
| Ignoring dirty ceramic pores | Bubbles become large and inefficient | Clean the diffuser regularly |
| Increasing bubble rate instead of improving flow | Can stress livestock without fixing distribution | Correct circulation first |
| Placing the drop checker too close | Reading may look falsely high | Place checker away from direct bubbles |
| Choosing a diffuser too small for the tank | CO₂ delivery may be limited | Match diffuser size to aquarium volume |
| Forgetting safety signs | Fish and shrimp may suffer | Reduce CO₂ if livestock behave abnormally |
CO₂ tuning should always be slow, observable and safe.
CO₂ Diffuser Troubleshooting
If your aquarium has CO₂ problems, diagnose the diffuser system before changing everything else. Many issues come from dirty ceramic membranes, poor placement or weak flow.
| Problem | Likely Cause | What to Check First |
|---|---|---|
| Drop checker stays blue | Low CO₂, poor diffusion, weak flow or bad placement | Diffuser cleanliness and circulation |
| Drop checker turns yellow | Too much CO₂ or checker too close to diffuser | Livestock behavior and checker location |
| Large bubbles | Clogged or poor ceramic membrane | Clean or replace diffuser |
| Plants only grow well near diffuser | CO₂ distribution is uneven | Filter flow and hardscape dead zones |
| Hair algae appears | Unstable CO₂, too much light or organic waste | CO₂ timing, PAR and maintenance |
| Fish gasp after CO₂ starts | CO₂ too high or oxygen exchange too low | Reduce CO₂ and increase surface movement |
| Inline diffuser reduces flow | Clogging, wrong size or installation issue | Clean unit and check hose compatibility |
If you are unsure whether CO₂ is actually dissolved enough, compare drop checker color with the Aquarium pH CO₂ Calculator and your livestock behavior. Use calculator results as guidance, not as permission to ignore fish safety.
How to Improve CO₂ Distribution Without Increasing Bubble Rate
More bubbles are not always the safest or smartest solution. Often, CO₂ distribution improves dramatically when flow and placement are corrected.
Try these improvements before increasing gas output:
- Clean the diffuser so bubbles are fine again.
- Move the diffuser lower in the tank.
- Place the diffuser in the main flow path.
- Adjust the filter outflow to push CO₂ across the aquarium.
- Remove dense plant overgrowth that blocks circulation.
- Trim stems that create dead zones.
- Reduce excessive hardscape blockage where possible.
- Move the drop checker temporarily to weak-growth zones.
- Use gentle surface ripple instead of heavy splashing.
- Consider an inline diffuser or reactor for larger systems.
This approach is safer because it improves efficiency rather than simply raising CO₂ concentration everywhere.
Choosing the Best CO₂ Diffuser for Your Aquarium
The best CO₂ diffuser depends on the aquarium’s size, filter type, plant demand and visual goals. A simple beginner tank may need only a small in-tank diffuser. A clean high-tech aquascape may benefit from an inline diffuser. A large display tank may justify a reactor.
| Your Setup | Recommended CO₂ Delivery | Reason |
|---|---|---|
| First pressurized CO₂ tank | In-tank ceramic diffuser | Simple, visible and easy to learn |
| Nano planted tank | Small diffuser or compact atomizer | Easy to tune at low rates |
| Rimless aquascape with canister filter | Inline diffuser | Keeps display clean |
| Large high-tech tank | Inline diffuser or reactor | Better distribution and efficiency potential |
| Mist-free display goal | CO₂ reactor | Maximizes dissolution before return |
| Low-pressure DIY CO₂ | Ladder or low-pressure diffuser | Works with lower pressure but less elegant |
| Dense aquascape with many dead zones | Diffuser plus flow optimization | Placement matters more than equipment alone |
Do not choose based only on aesthetics. A hidden diffuser is useless if it does not distribute CO₂ well. A visible diffuser is acceptable if it creates stable plant growth and safe livestock conditions.
CO₂ Diffuser Setup Checklist
Use this checklist before turning up your CO₂:
- Is the diffuser sized for the aquarium?
- Is the ceramic membrane clean?
- Are bubbles fine and even?
- Is the diffuser placed low in the tank?
- Is filter flow carrying CO₂ across the aquarium?
- Is the drop checker away from direct bubbles?
- Does CO₂ start before the lights turn on?
- Is surface agitation balanced, not extreme?
- Are fish and shrimp behaving normally?
- Are nutrients available enough for plants to use CO₂?
- Is light intensity appropriate for the CO₂ level?
- Have you made only one adjustment at a time?
If several answers are uncertain, fix setup and distribution before increasing gas output.
Final Recommendation
For most beginners, start with a clean in-tank ceramic CO₂ diffuser placed low in the aquarium and positioned so filter flow carries bubbles across the tank. Use a drop checker, watch fish behavior and adjust bubble rate slowly.
For cleaner aquascapes with canister filters, an inline diffuser is a strong upgrade because it keeps equipment out of the display. For large aquariums or mist-free setups, a CO₂ reactor may be the better long-term solution.
The best diffuser is not simply the most expensive one. It is the one that creates fine, stable, well-distributed CO₂ without stressing livestock and without making maintenance difficult.
Conclusion
An aquarium CO₂ diffuser is a small component with a huge impact. It decides how efficiently pressurized CO₂ enters the water, how evenly carbon reaches plants, and how predictable your high-tech planted tank becomes.
In-tank ceramic diffusers are simple and beginner-friendly. Inline diffusers create cleaner displays. Atomizers produce fine mist. Reactors offer high dissolution efficiency for larger or more advanced systems. Each method can work when it is sized correctly, cleaned regularly and supported by good flow.
Do not solve every CO₂ problem by increasing bubble rate. Clean the diffuser, improve placement, optimize flow and watch livestock carefully. When CO₂ diffusion works together with light, nutrients and maintenance, planted aquariums become more stable, more predictable and far more capable of lush growth.
💬 Join the Conversation
Are you using an in-tank ceramic diffuser, inline diffuser, atomizer or CO₂ reactor in your planted aquarium?
Tag us on Instagram @AquariumLesson — we’d love to see your CO₂ setup, diffuser placement, plant growth and aquascape progress.
FAQ
Where should I place a CO₂ diffuser in an aquarium?
Place the CO₂ diffuser low in the aquarium and in a flow path that carries bubbles across the tank. Avoid dead zones, surface-level placement and locations directly below the drop checker.
Is an inline CO₂ diffuser better than an in-tank diffuser?
An inline CO₂ diffuser is better for clean aquascapes and canister-filter setups because it keeps equipment out of the display. An in-tank diffuser is simpler, easier to inspect and often better for beginners.
Why are my CO₂ diffuser bubbles too large?
Large bubbles often mean the ceramic diffuser is dirty, clogged, damaged or too low in quality. Clean the diffuser and check pressure, tubing and seals before increasing the bubble rate.
How often should I clean a CO₂ diffuser?
Clean a CO₂ diffuser whenever bubbles become larger, uneven or weaker than usual. Many aquarists clean ceramic diffusers every few weeks to a few months, depending on algae, biofilm and water hardness.
Can a CO₂ diffuser cause algae?
A CO₂ diffuser does not directly cause algae, but poor diffusion or unstable CO₂ can contribute to algae. If CO₂ does not reach plants evenly, strong light and weak carbon availability can create imbalance.
Can I place the CO₂ diffuser under the filter outflow?
Yes, if the filter outflow carries the fine bubbles through the aquarium instead of sending them straight to the surface. The goal is longer contact time and better whole-tank distribution.
Do I need a CO₂ diffuser if I use a reactor?
No. A CO₂ reactor is an alternative delivery method that dissolves CO₂ before water returns to the aquarium. It replaces the need for a standard in-tank diffuser.
Why is my drop checker blue even though the diffuser is bubbling?
A blue drop checker with visible bubbles may mean low CO₂, poor diffuser placement, weak flow, a dirty diffuser, excessive surface agitation or incorrect drop checker placement. Do not increase CO₂ blindly before checking distribution.
Start building your aquarium in My Aquariums
Save this lesson and keep plant care guidance connected to your aquarium setup.
New to AquariumLesson? Start with our complete Aquarium Lessons Hub or return to the homepage at AquariumLesson.com.
Continue learning

References
- Aquasabi — Choosing the Right CO₂ Diffuser
- Aquarium Gardens — CO₂ Set Up Guide
- Aquarium Gardens — The CO₂ Drop Checker Help Guide
- Green Aqua — The Pros and Cons of Using a CO₂ Reactor
- Green Aqua — CO₂ Diffuser Cleaning
- Spec-Tanks — How to Clean Your Planted Aquarium’s CO₂ Diffuser
- PlantedBox — CO₂ Aquarium Atomizer Guide
- CO2Art — Things You Need to Know About Drop Checkers