CO₂ Bubble Rate Guide: Bubbles Per Second for Planted Tanks
Introduction
The CO2 bubble rate is one of the first numbers aquarists look at when setting up pressurized CO₂ for a planted aquarium. You open the needle valve, watch the bubble counter, and start asking the obvious question: how many bubbles per second should I use?
The honest answer is: bubbles per second are only a starting reference, not a universal CO₂ measurement. A bubble counter shows how much gas is passing through your equipment. It does not directly tell you how much CO₂ is dissolved in the aquarium water, how evenly it reaches plants, or whether your fish and shrimp are safe.
That is why two aquariums can use the same bubble rate and get completely different results. Bubble size, tank volume, diffuser efficiency, water flow, surface agitation, plant mass, light intensity, and CO₂ timing all change the real dissolved CO₂ level. One bubble per second may be plenty for a small low-light tank and far too little for a dense high-tech aquascape.
This guide explains how to use bubble rate correctly: as a repeatable adjustment tool, not as the final target. You will learn safe starting ranges, how to adjust bubbles per second, how to combine bubble rate with a drop checker, why flow matters, and how to avoid gassing fish while chasing plant growth. For the full equipment setup, start with the Aquarium CO2 System Guide. If you want to estimate CO₂ from pH and KH, use the Aquarium pH CO₂ Calculator.
Quick answer: Start with a conservative CO₂ bubble rate, often around one bubble per second for smaller planted tanks, then adjust slowly based on drop checker color, plant response, pH trend, flow and livestock behavior. Never treat bubbles per second as a fixed universal rule.
What You’ll Learn in This Lesson
- What CO₂ bubble rate really means
- Why bubbles per second are not a true CO₂ measurement
- Safe starting ranges for different tank sizes
- How to adjust CO₂ slowly with a needle valve
- How bubble rate, drop checker color and pH trend work together
- Why flow and diffuser placement change the result
- How to avoid too much CO₂ for fish and shrimp
- How to troubleshoot blue drop checkers, yellow drop checkers, algae and poor plant growth
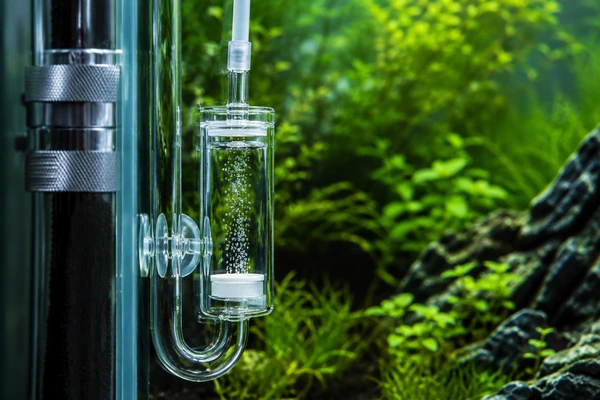
What Does CO₂ Bubble Rate Mean?
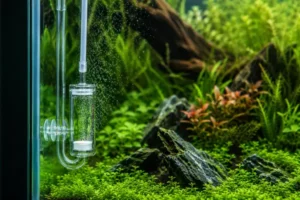
CO₂ bubble rate describes how many bubbles pass through the bubble counter per second. A bubble counter is usually installed between the regulator and the diffuser or reactor. It gives you a visible way to see whether gas is flowing and whether your setting is stable.
For example, if you see one bubble passing through the counter every second, your bubble rate is one bubble per second. If you see two bubbles every second, your rate is two bubbles per second. If you see one bubble every two seconds, your rate is 0.5 bubbles per second.
This is useful because the needle valve on a CO₂ regulator can be very sensitive. Without a bubble counter, small adjustments are hard to repeat. With a bubble counter, you can say, “I changed from one bubble per second to 1.5 bubbles per second” and then observe the tank response.
But bubble rate is not the same as dissolved CO₂. It is only the injection rate you see inside your equipment.
| Term | What It Means | What It Does Not Tell You |
|---|---|---|
| Bubble rate | How many CO₂ bubbles pass through the counter per second | Exact dissolved CO₂ in the aquarium |
| Bubble counter | Visual reference for gas flow | Whether plants receive CO₂ evenly |
| Needle valve | Fine adjustment control for gas flow | Whether your target is safe |
| Drop checker | Delayed visual CO₂ estimate | Instant real-time CO₂ level |
| pH trend | Shows how CO₂ affects water acidity over time | Exact safety by itself in every tank |
Use bubble rate to make repeatable adjustments. Use plant growth, livestock behavior, drop checker color, pH trend and algae patterns to judge whether the adjustment is actually working.
Ready to set up your own aquarium?
Save this lesson and keep plant care guidance connected to your aquarium setup.
Why Bubbles Per Second Are Not Universal
There is no universal bubbles-per-second number because bubbles are not standardized. One bubble counter may produce larger bubbles than another. One diffuser may dissolve CO₂ efficiently, while another lets much of the gas escape to the surface. One aquarium may have strong circulation, while another has dead zones behind plants and hardscape.
This means “two bubbles per second” is not a scientific value across all tanks. It is only meaningful inside your own setup, with your own regulator, bubble counter, diffuser, water flow and aquarium layout.
Bubble rate depends on:
- Tank volume
- Bubble counter design
- Bubble size
- Regulator stability
- Needle valve precision
- Diffuser or reactor efficiency
- Surface agitation
- Filter flow and circulation
- Plant mass and growth speed
- Light intensity
- CO₂ timing before lights turn on
- Fish and shrimp oxygen demand
This is why you should never copy another aquarist’s bubble rate blindly. Their equipment, tank and plant demand are different from yours.
What Is a Safe Starting CO₂ Bubble Rate?
A safe starting CO₂ bubble rate should be conservative. It is better to start low and increase slowly than to start high and stress fish or shrimp. Many beginner setups start around one bubble per second, then adjust based on the drop checker, plant response and livestock behavior.
The table below is only a starting guide. It is not a final target. Strong light, dense plant mass, inefficient diffusion or heavy surface agitation may require more CO₂. Sensitive livestock, low light or small tanks may require less.
| Aquarium Size | Conservative Starting Bubble Rate | Important Note |
|---|---|---|
| Nano tank under 40 L | About 0.5 bubble per second or less | Small tanks change quickly; adjust very carefully |
| 40–80 L planted tank | About 0.5–1 bubble per second | Good beginner starting range with careful monitoring |
| 80–150 L planted tank | About 1–2 bubbles per second | Diffusion and flow strongly affect the result |
| 150–250 L planted tank | About 2–3 bubbles per second | Large plant mass may need more, but increase slowly |
| 250 L+ planted tank | Often 3+ bubbles per second | Bubble counting becomes less precise in larger systems |
These ranges are not rules. They are safe starting points. The actual target is stable plant growth with no livestock stress.
How to Set Your CO₂ Bubble Rate Step by Step
The safest way to set CO₂ is slow adjustment. Do not open the needle valve widely and hope the drop checker catches up. A drop checker reacts slowly, and livestock may become stressed before the color warns you.
Start with a low rate, let the system stabilize, observe the tank, then adjust gradually. The goal is consistent CO₂ during the photoperiod, not dramatic changes from day to day.
Step-by-Step Bubble Rate Setup
- Install the CO₂ system securely and check for leaks.
- Use a bubble counter so adjustments are visible.
- Start with a conservative bubble rate.
- Turn CO₂ on before the aquarium lights turn on.
- Wait for the drop checker or pH trend to respond.
- Watch fish and shrimp closely after every change.
- Increase only in small increments if CO₂ appears low.
- Wait before making another adjustment.
- Improve flow and diffuser placement before simply adding more gas.
- Reduce CO₂ immediately if livestock show stress.
If you are still building the full system, the Aquarium CO2 System Guide explains the regulator, solenoid, check valve, tubing, diffuser and drop checker setup in more detail.
Bubble Rate and the Needle Valve
The needle valve controls the bubble rate. It is one of the most important parts of a pressurized CO₂ setup because small movements can create large changes in gas flow. Cheap or unstable needle valves can make CO₂ tuning frustrating.
When adjusting the needle valve, move slowly. After each adjustment, give the system time to stabilize. Some regulators respond immediately. Others drift slightly as working pressure settles. This is why you should not make multiple changes within a few minutes.
Good needle valve habits:
- Make tiny adjustments instead of big turns.
- Count bubbles after the rate stabilizes.
- Check the bubble rate again later in the day.
- Use a solenoid and timer for consistency.
- Avoid daily manual changes if possible.
- Watch for regulator drift as the cylinder empties.
- Use a reliable dual-stage regulator for high-demand systems when possible.
Stable CO₂ is usually better than maximum CO₂. Plants respond well to consistency, while livestock suffer when CO₂ swings too aggressively.
Bubble Rate and Drop Checker Color
The bubble counter tells you what you are injecting. The drop checker gives a delayed visual estimate of what is dissolved in the aquarium. These tools work best together.
If your bubble rate is stable but the drop checker stays blue during the main photoperiod, CO₂ may be too low, diffusion may be inefficient, or flow may not be carrying CO₂ to the checker. If the drop checker turns yellow, CO₂ may be too high or the checker may be too close to the diffuser.
| Bubble Counter | Drop Checker | Possible Meaning |
|---|---|---|
| Low bubble rate | Blue | CO₂ likely too low or still building |
| Moderate bubble rate | Green | Often a useful stable range |
| High bubble rate | Blue | Diffusion, placement or flow may be poor |
| Low bubble rate | Yellow | Checker may be near concentrated CO₂ or solution may be wrong |
| High bubble rate | Yellow | CO₂ may be too high; check livestock immediately |
Remember that a drop checker can take around one to two hours to respond. Do not adjust the bubble rate repeatedly while waiting for the color to change.
Bubble Rate and pH Drop
Many aquascapers also use pH drop to understand CO₂. When CO₂ dissolves in water, pH decreases. By comparing the aquarium’s pH before CO₂ injection with the pH during the photoperiod, you can estimate how strongly CO₂ is affecting the system.
This method is useful, but it must be interpreted carefully. Active soil, tannins, acids, buffers and other chemistry can affect pH. That means pH drop is a trend tool, not a perfect universal measurement.
Use pH drop to understand patterns:
- How much pH changes after CO₂ turns on
- How long it takes CO₂ to build before lights
- Whether CO₂ is consistent from day to day
- Whether surface agitation removes CO₂ too quickly
- Whether a bubble rate change actually affects the tank
If you want to compare pH, KH and estimated CO₂, use the Aquarium pH CO₂ Calculator. Treat the result as guidance, not as permission to ignore livestock behavior.
How Long Before Lights Should CO₂ Start?
CO₂ usually starts before the aquarium lights turn on. This gives the tank time to build dissolved CO₂ before plants begin photosynthesizing strongly. Many planted aquariums start CO₂ about one to two hours before lights on, but the ideal timing depends on the system.
If CO₂ starts too late, plants may spend the first part of the photoperiod carbon-limited. If CO₂ starts too early or too strongly, livestock may experience unnecessary stress before plants are using the CO₂ heavily.
| CO₂ Timing | Possible Result | Adjustment |
|---|---|---|
| Starts at lights on | CO₂ may lag during early photoperiod | Start earlier if plants struggle or algae appears |
| Starts 1 hour before lights | Common balanced starting point | Observe drop checker and livestock |
| Starts 2 hours before lights | Can work in larger or slower-diffusing systems | Use caution with fish and shrimp |
| Runs all night | Usually unnecessary and can increase risk | Use a solenoid timer instead |
| Turns off before lights out | Reduces wasted CO₂ late in the day | Do not turn off so early that plants run short |
CO₂ timing should be consistent. A timer and solenoid are much safer than manually turning CO₂ on and off whenever you remember.
How Tank Size Affects CO₂ Bubble Rate
Larger aquariums usually need more CO₂ than smaller aquariums, but tank size is not the only factor. A 100 L high-light aquascape with dense stems may need more CO₂ than a 200 L low-light tank with slow epiphytes.
Tank size affects the starting point because more water volume usually requires more gas to reach the same dissolved concentration. But plant demand, light intensity and diffusion efficiency decide the final rate.
Small tanks deserve extra caution because changes happen quickly. A small increase in bubble rate can have a large effect. Large tanks often need stronger equipment and better distribution because CO₂ has to reach more water volume and more plant zones.
| Tank Size | Main CO₂ Risk | Best Practice |
|---|---|---|
| Nano tanks | CO₂ can rise too quickly | Start very low and adjust slowly |
| Medium tanks | Uneven distribution can cause mixed results | Use good flow and representative monitoring |
| Large tanks | Bubble counting becomes less precise | Focus on pH trend, drop checker, plants and livestock |
| Deep tanks | Light and CO₂ demand may vary by depth | Check substrate zones and flow patterns |
| Long tanks | CO₂ may not reach both ends evenly | Improve circulation and diffuser placement |
Tank size helps you choose a starting bubble rate. It should not decide the final bubble rate alone.
How Light Intensity Changes CO₂ Demand
Light intensity is one of the biggest reasons bubble rate differs between aquariums. Stronger light drives faster photosynthesis. Faster photosynthesis increases demand for CO₂ and nutrients. If CO₂ does not match the light level, algae and weak plant growth often appear.
This is why increasing light without improving CO₂ can create problems. The tank may look brighter, but plants become carbon-limited. Algae then uses the unstable conditions more easily.
| Light Level | CO₂ Demand | Bubble Rate Strategy |
|---|---|---|
| Low light | Low to moderate | Use conservative CO₂ or no injected CO₂ depending on plants |
| Moderate light | Moderate | Stable CO₂ helps growth and algae control |
| High light | High | CO₂ must be stable, well-distributed and monitored |
| Very high light | Very high | Reduce light if CO₂ cannot safely keep up |
For light planning, read Aquarium PAR Explained. PAR helps you understand whether your lighting is truly low, moderate or high from the plant’s perspective.
How Plant Mass Changes Bubble Rate
Plant mass changes CO₂ demand over time. A newly planted aquascape with small plants may need less CO₂ than the same aquarium three months later when stems, carpets and floating plants have filled the tank.
As plants grow, they consume more carbon during the photoperiod. If the bubble rate stays the same while plant mass increases significantly, the tank may become CO₂-limited even though nothing “broke.”
You may need to reassess CO₂ when:
- Stem plants become dense
- Carpet plants cover the substrate
- Floating plants shade the surface
- Red plants begin growing faster
- Trimming frequency increases
- Algae appears after plant mass changes
- The drop checker is slower to reach green
- pH drop becomes smaller than before
CO₂ tuning is not a one-time event. As the aquarium matures, bubble rate, flow and trimming routine may need small updates.
How Flow and Diffusion Change CO₂ Bubble Rate
Flow and diffusion often matter more than simply adding more bubbles. If CO₂ is not dissolving well or not reaching plant zones, increasing the bubble rate may waste gas and still leave plants carbon-limited.
A diffuser should usually be placed low in the aquarium so bubbles have more time to travel through water. Flow should carry CO₂ mist or dissolved CO₂ through the plant mass, not let it rise straight to the surface and escape.
Poor CO₂ distribution can cause one part of the tank to grow well while another part gets algae. The bubble rate may look high, but plants in dead zones still receive too little usable carbon.
| Problem | Possible Flow or Diffusion Cause | Better Fix |
|---|---|---|
| High bubble rate but blue drop checker | CO₂ not reaching the checker or dissolving well | Improve diffuser placement and circulation |
| Bubbles go straight to the surface | Diffuser placement or flow pattern is poor | Place diffuser lower and in flow path |
| Algae in one corner | CO₂ dead zone | Improve flow before increasing gas |
| Fish stressed near one area | CO₂ concentration may be uneven | Distribute flow more gently and evenly |
| Plants pearl only near diffuser | Localized CO₂ advantage | Improve whole-tank distribution |
If CO₂ seems inconsistent across the aquarium, review Aquarium Filter Flow Guide. Flow is part of CO₂ delivery, not a separate issue.
Bubble Rate for Diffusers vs Reactors
Diffusers and reactors dissolve CO₂ differently, so the same bubble rate may produce different results. A ceramic diffuser creates fine bubbles inside the aquarium. An inline atomizer creates mist in the filter return line. A reactor tries to dissolve CO₂ more completely before water returns to the tank.
A reactor may achieve stronger dissolution at a lower visible bubble rate than a poor diffuser. A clogged diffuser may require more pressure and still dissolve CO₂ inefficiently. An inline atomizer may create excellent distribution in some tanks but too much mist in others.
| CO₂ Delivery Method | Bubble Rate Meaning | Practical Note |
|---|---|---|
| In-tank ceramic diffuser | Visible bubbles enter the aquarium | Placement and flow are critical |
| Inline atomizer | Bubbles are counted before mist enters return line | Can improve distribution but may create visible mist |
| CO₂ reactor | More gas may dissolve before reaching the tank | Bubble rate may not compare to diffuser systems |
| Ladder diffuser | Bubbles travel slowly upward | Often used in simpler or smaller setups |
| Poor or clogged diffuser | Bubble rate may be misleading | Clean or replace equipment before increasing CO₂ |
Do not compare bubble rates across different delivery methods. Compare plant response, pH trend, drop checker color and livestock safety inside your own tank.
Signs Your CO₂ Bubble Rate Is Too Low
A low bubble rate may be fine in low-light tanks, but it can become a problem in high-light planted aquariums. When CO₂ is too low for the plant demand, plants often struggle even when fertilizer and light seem strong.
Possible signs of too little CO₂ include:
- Drop checker remains blue during the photoperiod
- Plants stop growing after light intensity increases
- Hair algae or staghorn algae appears in high-light areas
- Carpet plants grow upward or stall
- Stem plant tops become small or weak
- Plants pearl only near the diffuser
- New growth looks unstable after trimming
- pH drop is much smaller than expected
- Algae appears despite available nutrients
Before increasing the bubble rate, check flow, diffuser cleanliness, CO₂ timing and surface agitation. Many CO₂ problems are distribution problems, not only injection-rate problems.
Signs Your CO₂ Bubble Rate Is Too High
Too much CO₂ is dangerous for fish and shrimp. Plants may grow better with more carbon, but livestock safety is the limit. A bubble rate that pushes the drop checker yellow or causes stressed behavior should be reduced immediately.
Warning signs of too much CO₂ include:
- Fish gasping at the surface
- Rapid gill movement
- Fish gathering near filter outflow
- Fish becoming lethargic or hiding unusually
- Shrimp climbing upward or becoming inactive
- Snails moving toward the surface
- Drop checker turning yellow
- Sudden stress after increasing CO₂
- Strong pH drop combined with livestock discomfort
If livestock show stress, reduce or stop CO₂ and increase surface agitation. Do not wait for a drop checker to confirm the danger. The animals are the most important safety indicator.
Bubble Rate and Surface Agitation
Surface agitation affects CO₂ because it increases gas exchange. Strong surface movement can release CO₂ from the water faster, meaning you may need more injection to maintain the same dissolved level. Very low surface movement can conserve CO₂ but reduce oxygen exchange and increase livestock risk.
The goal is not a still surface. The goal is controlled gas exchange. You want enough surface movement for oxygen and safety, but not so much that CO₂ is wasted immediately.
| Surface Movement | CO₂ Effect | Practical Risk |
|---|---|---|
| Very still surface | CO₂ is conserved | Lower oxygen exchange and livestock risk |
| Gentle ripple | Balanced gas exchange | Often best for planted CO₂ tanks |
| Strong agitation | CO₂ escapes faster | May require higher bubble rate |
| Air stone during photoperiod | Can drive off CO₂ | May reduce planted tank efficiency |
| Night aeration | Can improve oxygen after lights off | Useful in some high-growth tanks |
If you keep increasing bubble rate but cannot reach stable CO₂, check whether surface agitation is excessive. If fish struggle when CO₂ rises, increase oxygen exchange and reduce CO₂ intensity.
Bubble Rate for Low-Tech and Medium-Tech Tanks
Low-tech aquariums do not always need pressurized CO₂. Many easy plants grow well without it when light is moderate and fertilization is stable. If you add CO₂ to a low-tech or medium-tech tank, keep the bubble rate conservative because plant demand is usually lower than in high-tech aquascapes.
A small amount of stable CO₂ can improve growth and reduce some plant limitations, but it should not be used as an excuse to run excessive light. If the tank has slow plants like Anubias, Java Fern, Cryptocoryne and mosses, a gentle CO₂ routine may be enough.
- Start with a low bubble rate.
- Keep lighting moderate.
- Use a drop checker or pH trend as a guide.
- Watch fish and shrimp carefully.
- Do not chase high-tech growth without high-tech maintenance.
- Keep fertilizer available but not excessive.
- Increase CO₂ only if plants show real demand.
If you are not using injected CO₂, choose plants and lighting accordingly. The Aquarium Plant Light Requirements guide can help match plant demand to the system.
Bubble Rate for High-Tech Aquascapes
High-tech aquascapes have stronger CO₂ demand because they usually combine high PAR lighting, dense plant mass, carpeting plants, red stems and frequent trimming. In these tanks, CO₂ stability is often more important than the exact bubble count.
A high-tech tank may need a higher bubble rate, but only if diffusion, flow and oxygen balance can support it safely. Pushing more gas into a poorly circulated tank can create dangerous zones without solving plant problems.
- Use a reliable regulator and precise needle valve.
- Start CO₂ before lights turn on.
- Use strong but controlled circulation.
- Monitor drop checker color and pH trend.
- Watch carpets and dense stems for CO₂ limitation.
- Keep macros and micros available so plants can use CO₂.
- Trim regularly to prevent dead zones and shading.
- Never prioritize plant speed over livestock safety.
High-tech tanks also need strong fertilizer balance. CO₂ cannot replace nutrients, and nutrients cannot replace CO₂.
Bubble Rate and Fertilizer Balance
CO₂ and fertilizer are connected. When CO₂ improves, plants can grow faster and use more nutrients. If fertilizer does not match that stronger growth, deficiencies may appear. If fertilizer is strong but CO₂ is weak, plants may still stall.
After increasing CO₂ successfully, watch for nutrient demand changes. Fast stem plants may need more nitrogen, phosphorus, potassium, iron and trace elements. Carpets may recover faster after trimming. Floating plants may consume nutrients quickly.
Signs that nutrients may need review after CO₂ tuning include:
- Older leaves yellowing after faster growth
- Green spot algae with low phosphate
- Pinholes from possible potassium shortage
- Pale new growth from iron or trace limitation
- Plants growing faster but becoming weaker
- Carpets spreading but losing color
If this happens, review Macronutrients for Aquarium Plants and Micronutrients for Aquarium Plants. CO₂ works best when nutrients are complete and stable.
Common CO₂ Bubble Rate Mistakes
Most bubble rate mistakes happen because aquarists treat bubbles per second as a universal formula. It is not. The bubble counter is a reference tool inside your own system.
| Mistake | Why It Causes Problems | Better Approach |
|---|---|---|
| Copying another tank’s bubble rate | Equipment and tank demand are different | Use your own drop checker, pH trend and livestock response |
| Increasing CO₂ too quickly | Can stress or kill fish and shrimp | Adjust in small steps and wait |
| Ignoring flow | CO₂ may not reach plant zones | Improve circulation before adding more gas |
| Chasing a perfect drop checker color | Drop checkers are delayed and approximate | Use them as guidance, not as absolute truth |
| Running CO₂ at night | Usually unnecessary and can raise risk | Use a solenoid timer |
| Using high light before CO₂ is stable | Algae and plant stress become likely | Stabilize CO₂ first or lower light |
| Ignoring fish behavior | Livestock stress is the real danger signal | Reduce CO₂ immediately if animals struggle |
The safest CO₂ strategy is stable, gradual and observable. If you cannot explain what a bubble rate change did to your tank, you are adjusting too fast.
Troubleshooting CO₂ Bubble Rate Problems
If plant growth is poor or algae appears, do not immediately turn the needle valve higher. First identify whether the issue is injection, diffusion, flow, timing, light, nutrients or livestock safety.
| Problem | Likely Cause | What to Check First |
|---|---|---|
| Drop checker stays blue | Low CO₂, poor flow, bad diffuser or late timing | Diffuser, circulation and CO₂ start time |
| Drop checker turns yellow | Too much CO₂ or poor placement | Livestock behavior and checker position |
| Fish gasp after CO₂ starts | CO₂ too high or oxygen exchange too low | Reduce CO₂ and increase surface movement |
| Hair algae appears | Unstable CO₂, too much light or organics | CO₂ consistency, PAR and cleaning |
| Plants pearl near diffuser only | Uneven CO₂ distribution | Flow path and diffuser placement |
| Carpet stalls | Low substrate CO₂, low PAR or nutrient issue | Substrate flow, PAR and fertilization |
| Bubble rate changes by itself | Regulator or needle valve instability | Working pressure, leaks and regulator quality |
If algae is part of the problem, read Aquarium Lighting and Algae. CO₂ problems usually appear together with light and nutrient imbalance.
Safe CO₂ Adjustment Checklist
Use this checklist whenever you change bubble rate:
- Is the regulator securely installed and leak-free?
- Is the bubble counter filled and readable?
- Is the diffuser clean and placed low enough?
- Does CO₂ turn on before the lights?
- Is flow carrying CO₂ through the whole tank?
- Is the drop checker placed away from direct bubbles?
- Have you waited long enough before judging the color?
- Are fish and shrimp behaving normally?
- Is surface agitation providing enough oxygen exchange?
- Is light intensity appropriate for the CO₂ level?
- Are nutrients available enough for faster plant growth?
- Did you make only one small adjustment at a time?
If any livestock shows stress, stop tuning for plant performance and correct safety first.
Final Recommendation
Use CO₂ bubble rate as a starting point and a consistency reference, not as the final measurement. Begin conservatively, especially in small tanks and shrimp aquariums. Increase slowly only when plant demand, drop checker color, pH trend and livestock behavior support the change.
For many smaller planted tanks, around one bubble per second is a common safe starting area. Nano tanks may need less. Larger or high-tech aquascapes may need more. But the final answer always depends on your tank’s real response.
The best CO₂ setup is not the one with the highest bubble rate. It is the one with stable delivery, good diffusion, healthy plants, controlled algae and livestock that behave normally every day.
Conclusion
CO₂ bubble rate is useful, but only when understood correctly. Bubbles per second tell you how much gas is passing through your bubble counter. They do not directly tell you the exact dissolved CO₂ level in the aquarium.
Start low, adjust slowly, and judge the result through the whole planted tank system. Use the bubble counter for repeatability, the drop checker for delayed visual guidance, pH trend for pattern tracking, plant growth for long-term success, and livestock behavior for safety.
When bubble rate is balanced with light, flow, fertilizer and oxygen exchange, CO₂ becomes one of the strongest tools for healthy planted aquarium growth. When it is rushed or copied blindly, it becomes a risk. Tune patiently, observe carefully, and let the aquarium show you the correct setting.
💬 Join the Conversation
What CO₂ bubble rate are you using in your planted aquarium, and how are you checking whether it is safe and effective?
Tag us on Instagram @AquariumLesson — we’d love to see your CO₂ setup, bubble counter, plant growth and aquascape progress.
FAQ
How many CO₂ bubbles per second should I use?
There is no universal bubble rate. Many smaller planted tanks start around one bubble per second, while nano tanks may need less and larger high-tech aquariums may need more. Adjust slowly based on drop checker color, plant growth and livestock behavior.
Is one bubble per second enough for a planted aquarium?
One bubble per second can be enough for some small or moderate planted tanks, but it may be too little for larger high-light aquascapes. It depends on tank size, plant mass, diffuser efficiency, flow and surface agitation.
Can too many CO₂ bubbles harm fish?
Yes. Too much CO₂ can stress or kill fish and shrimp. Warning signs include gasping at the surface, rapid breathing, lethargy, unusual hiding, shrimp climbing upward or a yellow drop checker.
Should I increase CO₂ if my drop checker is blue?
Maybe, but check flow, diffuser placement, CO₂ timing and solution freshness first. A blue drop checker can mean low CO₂, but it can also mean poor distribution or bad placement.
Why is my drop checker blue even with a high bubble rate?
A high bubble rate with a blue drop checker often points to poor diffusion, weak circulation, surface agitation driving off CO₂, a clogged diffuser, bad checker placement or old indicator solution.
Should CO₂ run at night?
In most planted aquariums, CO₂ should not run all night. Plants use CO₂ mainly during the light period. A solenoid and timer allow CO₂ to start before lights on and turn off before or around lights out.
Is bubble rate better than a drop checker?
No. Bubble rate shows gas flow through the counter. A drop checker gives a delayed estimate of dissolved CO₂. Use both together, and always prioritize fish and shrimp behavior.
Can I use pH to set CO₂ bubble rate?
pH trend can help you understand CO₂ buildup, especially when compared before and during injection. However, active soil, buffers and acids can affect pH, so use it together with plant response, drop checker color and livestock safety.
Start building your aquarium in My Aquariums
Save this lesson and keep plant care guidance connected to your aquarium setup.
New to AquariumLesson? Start with our complete Aquarium Lessons Hub or return to the homepage at AquariumLesson.com.
Continue learning

References
- Aquarium Co-Op — How to Set Up a CO₂ System for Planted Aquariums
- Aquarium Gardens — CO₂ Set Up Guide
- Aquarium Gardens — The CO₂ Drop Checker Help Guide
- Green Leaf Aquariums — Aquarium CO₂ Installation & Monitoring Guide
- Spec-Tanks — How to Adjust CO₂ Flowrate in a Planted Aquarium
- CO2Art — Things You Need to Know About Drop Checkers
- UKAPS — The Right CO₂ Level in Your Planted Tank